Installation
This chapter will explain how to install PastPerfect on a single computer or a network. It will also show you how to load data from an older version of PastPerfect. At the end of the chapter you will find a list of the new features in version 5.0.
Installation on One Computer
- Close all programs on the computer.
- Insert the PastPerfect CD into the computer's CD or DVD drive.
- The installation program will start automatically.
- Follow the instructions on the screen.
- On the Installation Folder screen, leave the default path c:\pp5 if possible.
- On the Select Packages screen, choose the Single Computer or Server option.
- Continue with the on screen instructions to complete the installation.
If the installation does not start automatically, click Start | Computer and locate the CD or DVD drive. You should see the drive in the Devices with Removable Storage section, and its label should read "PastPerfect 5.0." Right click on the CD/DVD drive and choose Install or run program from the menu. Once the program is installed, remove the CD and store it in a safe place.
The installation will create this icon on the Windows desktop that you can use to start the PastPerfect program.
TIP: PastPerfect cannot be installed into a folder with a space in the name. By default, it is installed into c:\pp5. While you can certainly specify a different drive, such as d:\pp5, we recommend that you not change the folder. For example, c:\Program Files\pp5 will not work because of the space between "Program" and "Files."
Installation on a Network
PastPerfect is designed to run on peer-to-peer and client/server networks. For PastPerfect to operate as a network program, you will need to install on Windows XP, Vista, Windows 7, Windows 8/8.1, Windows 10, or Windows Server 2003 or higher. You will also need to purchase a network upgrade for PastPerfect.
To optimize performance, the PastPerfect program is installed on each workstation with shared access to common data files residing on the network file server. For small networks with two or three computers, a peer-to-peer network will be acceptable. A peer-to-peer network is simply a group of computers connected to share resources.
For larger networks, a client/server based network offers greater reliability and security. A server is a dedicated computer, usually more powerful than a typical desktop computer, running server software such as Windows Server 2012 or Windows Server 2016.
To install PastPerfect on a Windows network, you will need the following:
- Two or more computers running Windows XP or higher, or for client/server networks, Windows 2003 or higher
- One computer to act as the peer-to-peer network server or a dedicated file server
- A network interface card in each of the computers
- A network cable between the computers
- A network device such as a switch, router or hub (required for three or more computers when using a twisted pair cable with RJ45 connectors)
Note: Wireless networks are not suggested for PastPerfect network use.
Before installing PastPerfect on a network, you must first get the network installed and operating correctly. This involves installing the network interface cards in each computer (if needed), connecting computers with network cables, and configuring the network software. Instructions for installing network interface cards and cables should be provided by your hardware supplier. Consult your Windows Operating System documentation for instructions on configuring the network software. If you do not already have a networked computer system and you do not have computer professionals on staff, you may need to hire a network installer to install the network hardware and software. For best performance your network should provide a throughput of 100 Megabits per second.
Once the network is up and running, follow these steps to install PastPerfect.
On the network file server computer
- Close all programs on the computer.
- Insert the PastPerfect CD into the computer's CD or DVD drive.
- The installation program will start automatically.
- Follow the instructions on the screen.
- On the Installation Folder screen, leave the default path c:\pp5 if possible.
- On the Select Packages screen, choose the Single Computer or Server option.
- Continue with the on-screen instructions to complete the installation.

The installation will create this icon on the Windows desktop that you can use to start the PastPerfect program. Start PastPerfect. From the Main Menu click Setup and Network and then click the Install Network Upgrade button. You will be asked to insert the Network Upgrade disc to finish this task.
NOTE: Make sure that all workstations running PastPerfect have full Read, Write, Create and Delete privileges to the folder on the server where PastPerfect was installed (by default c:\pp5).
Once PastPerfect has been installed on the server, the Network Upgrade has been unlocked, and the pp5 folder has been shared so that all PastPerfect users have full access, you are ready to install the program on additional networked computers.
On the other computers (workstations)
- Close all programs on the computer.
- Insert the PastPerfect CD into the computer's CD or DVD drive.
- The installation program will start automatically.
- Follow the instructions on the screen.
- On the Installation Folder screen, leave the default path c:\pp5 if possible.
- On the Select Packages screen, choose the Network Workstation option and uncheck the Single Computer or Server option.
- Continue with the on-screen instructions to complete the installation.
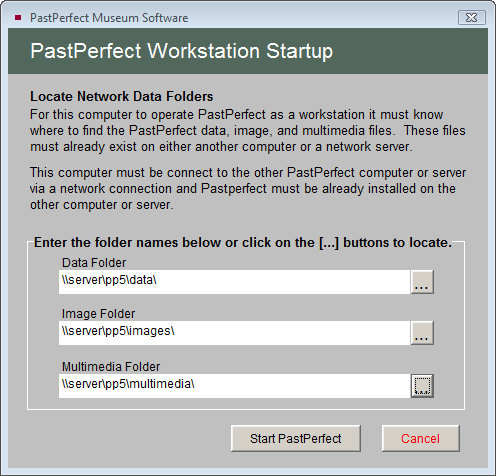
After the installation is complete, start PastPerfect. You will be asked to enter the folder names on the file server where the PastPerfect data, images, and multimedia files were installed. For example, if the file server computer is named "Server" and the program and data are installed in the c:\pp5 folder on the server, and the pp5 folder is shared with the name "pp5," then the entries would be "\\Server\pp5\data\" , "\\Server\pp5\images\", and "\\Server\pp5\multimedia\".
Network Folders example (Notice the paths begin with two backslashes
"\\" and end with one backslash.)
You may want to write your folder names here for future reference.
Data folder:_____________________________________
Image folder:____________________________________
Multimedia folder:______________________________
The entries for the folders cannot contain spaces. For that reason, if the server computer name is "File Server" or the folder name on the server is Program Files\pp5, it will not work. The entries "\\File Server\pp5\data\" and "\\Server\Program Files\pp5\data\" both contain a space and are unacceptable. If the server name and the folder paths must contain a space in the name for your network, use the Windows Map Network Drive feature to avoid any problems.
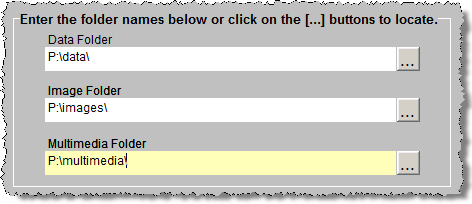
Windows Map Network Drive allows you to create a new drive letter to specify a distinct path on another computer. For example, you could create a virtual drive letter "P:" on the workstation computer that is mapped to "\\File Server\pp5\." In this case, the entries for the PastPerfect network folders would be "P:\data\", "P:\images\", and "P:\multimedia\".
Network Folders with mapped drive (Notice that the drive letter
"P" is entered with a following colon and backslash, and
the entry ends with a backslash.)
To set up drive mapping, you should consult Windows Help. Here are the instructions for Windows Vista.
- Open Computer and choose Map Network Drive from the Tools menu.
- Select the drive letter from the Drive drop-down menu.
- In Folder, type the path to the folder you want, e.g., "\\File Server\pp5" or use the Browse button to navigate to the PP5 folder on the server.
- Be sure to put a check in the box Reconnect at logon. Without this option your drive mappings will have to be reentered each time you restart the computer.