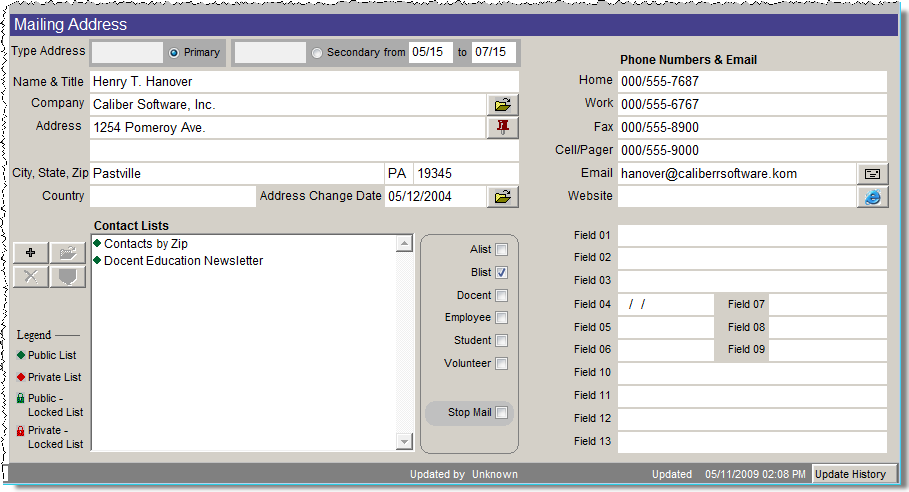
Contacts Mailing Address Screen View
Primary and Secondary Address - For contacts with summer and winter addresses, you may enter a primary address and secondary address. Enter the MM/DD range when the contact wishes to receive his or her mail at the secondary address. PastPerfect will automatically switch to displaying and printing the secondary address during the specified date range. You may select a type of primary and secondary address, such as Summer, Winter, Home, or Work.
For example, if you have a contact who is at his primary address in Missoula, MT between May 1 and October 31, but then goes to Tampa, FL between November 1 and April 30 each year, here is how you would enter the addresses:
In the primary address, enter the address in Missoula, MT, but do not enter any dates. Choose "Summer" as the type.
In the secondary address, enter the address in Tampa, FL and enter the dates From "11/01" Thru "04/30" then choose "Winter" as the type.
If you do not enter a date range, PastPerfect will always use the primary address for mailings. This can be useful if you want to use a home address as the primary address, but you also want to store a work address in the record but not mail to it.
The address that you enter when the Primary radio button is selected is the primary address; the address that you enter when the Secondary radio button is select is the secondary address. Once the addresses are both entered and saved, you may view and edit the other address by clicking the View Other Address button under Actions on the Sidebar. The primary and secondary addresses also include the phone number and fax number fields.
Company - Note the file folder icon next to the Company field. This indicates that there may be additional information about the company. Click on the file folder icon to edit or view the information.
Pushpin Icon - You may map the address contained in the primary or secondary address fields by clicking the pushpin icon. The address may also be mapped by clicking on the Map this Contact button under Actions in the Sidebar. You must have mapping software installed to use this feature. Mapping software can be set up by going to the Main Menu | Setup | Mapping.
Address Change Date/Address History - This field is automatically filled when you change the address for the contact. Click the associated file folder icon to view the contact's address change history, or click the View Address History button on the Sidebar under Actions.
Email - Enter one email address for the contact. This can be used to send an email directly to the contact from this record, or for mass emails from Contact Lists.
Send Email - The letter icon next to the email address will allow you to compose and send an email to this contact. Be sure your email parameters are set up as described in the Setup Contacts section of this chapter before trying to send email. An email address must be provided in the Email field to send email. To send an email to a contact from the contact screen:
Website - Enter a website associated with this contact. You may view the website by clicking the Internet Explorer icon to the right of the Website field. You must be connected to the Internet to view Web pages.