Printing Labels and Envelopes
The process of printing labels and envelopes is similar to printing letters, as they may be printed either one at a time or for a list of contacts.
Print One Label or Envelope from the Contacts Screen
PastPerfect has a special built-in printing feature that allows you to print individual mailing labels when you print a letter from the Contacts screen. This feature allows you to reuse mailing label stock. To print one label or envelope, click the Print button at the top of the contact record. You will see this screen.
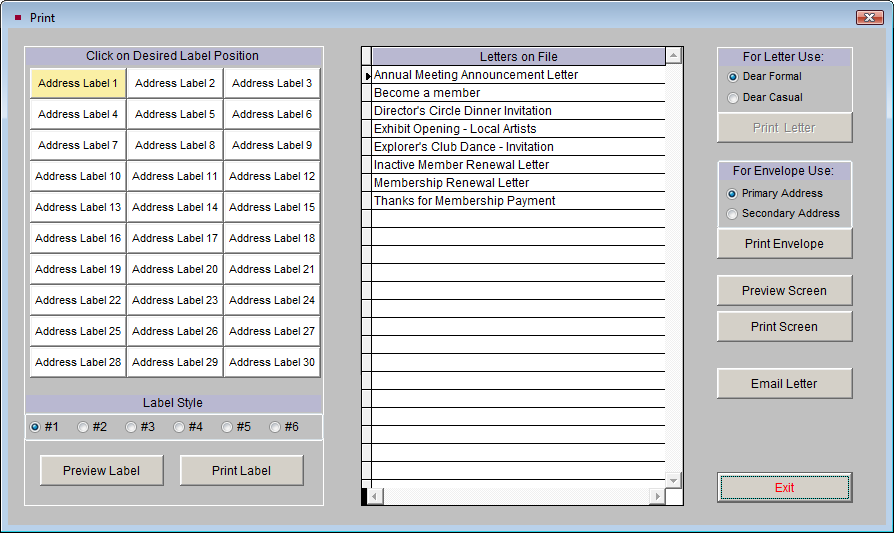
The left side of the screen displays a sample label sheet. Simply select the position on the label sheet you want to use by clicking on the position. The printer will print the contact mailing information on that particular label. You may select your Label Style at the bottom of the screen. To preview, click the Preview Label button. If you are ready to print, click the Print Label button.
To print an envelope, first choose whether you want the Primary or Secondary Address used. Then click Print Envelope to send it to your printer.
NOTE: The Temporary Custody and Accession Thank You Letter Envelopes are printed one at a time from the Thank You Letter screen in the respective sections.
Print Labels or Envelopes Using a Contact List
To print labels or envelopes for a list of contacts, select Contact Lists from the PastPerfect Main Menu. This will open the Contacts List Manager screen, which shows the User Defined Lists and Fixed Lists. Select the desired list and click View Selected List on the Sidebar.
Contacts Print screen

You may use the Narrow List button to select a specific range of contacts from this list, if you want to narrow the list down further. To continue printing labels or envelopes, click the Print, Export and Email button on the Sidebar. This will open the Print/Export screen, seen in below.
Print/Export screen

In the Print/Export Settings area, you may choose to exclude contacts from having labels or envelopes printed for them. To exclude contacts with Stop Mail, do not check the box next to Include Contacts Marked Stop Mail. To exclude Life Members, leave the box next to Include Life Members empty. Also, if you use primary and secondary addresses, to ensure you have the correct addresses, make sure the date in the Mailing Date field is the date you are sending the mailing.
Then in the Print/Export Options section, click the radio button next to Print Labels & Envelopes, then click the Print button. On the next screen, choose your label style or envelope and click either Preview or Print.
Print screen
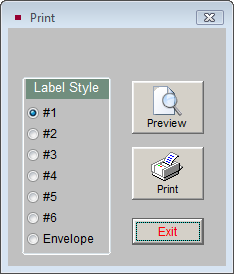
TIP: If you are using Alternate Billing Addresses, be sure to choose Label Style #4, #5, or #6.
After printing your labels or envelopes, be sure to add the entry to the mailing log so you can track the mailing later.