Import Data
PastPerfect provides easy portability of your data with the data import and export functions. You may use Import to load data from other applications. To open the Import Data screen, click the Utilities drop-down menu and go to Import.
Importing data into PastPerfect only adds new records. It does not update existing records. Please be sure you have backed up your PastPerfect data before performing an import.
Pre-Import Data Cleanup
Before importing data, it is important to make sure the data you will be importing is cleaned up and includes the fields PastPerfect requires. Here are a few tips:
- Be sure you are not duplicating Contact ID#s or Object IDs. This means you should not have duplicates within the file you are importing and the IDs you are importing should not already be used in PastPerfect.
- If you are importing into Contacts, you will need to have a field in your file for Contact ID#s for the import to work. This field can be empty, in which case PastPerfect will assign the Contact ID# upon reindexing.
- You must have Object IDs if you are importing into one of the catalogs - Objects, Photos, Archives, or Library. You must have an Accession number if you are importing into Accessions. PastPerfect will not assign these numbers.
- You must have an Object Name for each item if you are importing into one of the catalogs - Objects, Photos, Archives, or Library. If you are not sure what to name the item, use "Unknown."
- Please create as many fields in your file as possible. You will not be able to import more data into these records later. For Contacts data, consider creating fields for First Name, Last Name, Name & Title, Dear Formal and Dear Casual.
- You can import into only one database at a time - Objects or Photos, etc. You may need to modify your data file so it is broken up into smaller files that contain records for just one database.
- If importing from Excel, remove any columns on your Excel file that you are not importing. Empty columns will result in data going into the wrong fields.
Import Data screen

Valid File Formats for Importing
Below are the file formats that can be imported into PastPerfect.
dBase - This choice includes data from dBase III-V. Before you import the data, you must be sure that the field names and types in your data table match the field names and types in PastPerfect. When importing, only data in fields with names and types that exactly match the PastPerfect field names and types will be transferred. A list of PastPerfect field names and types for each catalog may be previewed/printed from the Main Menu | Reports | Field Descriptions. The Field Descriptions reports describe the contents of each field. The field name appears at the end of the description in square brackets in all capital letters.
For example, the Accession# field is listed as [ACCESSNO : Character (15)]. This indicates that to transfer data from your file to the PastPerfect Accession# field, your corresponding data field must be named "accessno." The type and size is listed after the field name, for example: [Character (15)] indicates a character field maximum length 15 characters, while [Numeric (10;2)] indicates a numeric field length 10 with 2 decimal places format such as #######.##; [Date] indicates a date field; [Datetime] indicates a field containing both date and time, and [Memo] indicates an unlimited character field.
To change the names and types of your data fields in the source file, you will need to open the file with the dBase program and use the Modify Structure command. See your dBase documentation for more information.
FoxPro - This choice includes data from FoxPro version 2.5 through Visual FoxPro version 9.0. The procedure for preparing data to import from FoxPro is the same as that for dBase, described above.
Excel 2 - Use this to import data from Excel worksheets versions 2.0, 3.0, and 4.0. Please make sure that your file is saved as a worksheet, instead of the default workbook format. You may do this in your Excel file by going to File | Save As and changing the file type.
Excel 5 - Use this choice to import data from Excel worksheets version 5.0/95 or 97/2000/2003/2007. If you are using MS-Excel 2007, please save your data as an Excel version 5.0/95 workbook and delete all the sheets except the one you are importing.
Important Note: When importing data from Excel and ASCII files, a limit of 254 characters per field is imposed. Fields with text longer than 254 characters will be truncated.
ASCII - Use this option to import data from an ASCII delimited text file. This is a file in which each record ends with a carriage return and line-feed. Field contents must be separated from each other by commas. Do not include extra spaces before or after the commas. Character field values must be delimited by double quotation marks. For example, the fields Object ID, Object Name and Condition would appear like this:
"1997.001.0001", "Pitcher", "Good"
"1997.001.0002", "Plate, Commemorative", "Fair"
You can import dates from delimited files if the dates are in proper date format. The date format should be either mm/dd/yy or mm/dd/yyyy. Including the century portion of a date is optional. PastPerfect will import a date, such as 12/25/95, that doesn't include the century and assumes the date is in the 20th century. This option may also be used to import CSV (Comma Separated Value) files.
ASCII (tab delimited) - This is almost identical to standard ASCII except that fields are separated by a TAB instead of a comma.
Procedure for Importing Data
Once your data is cleaned up and ready for importing, please follow these steps. Before performing this action, make a backup to hard drive.
Select Source File Type & Name
To begin the import process, select the format of the data you will be importing. The options are FoxPro, dBase, Excel 2, Excel 5, ASCII, and ASCII tab delimited. Please note that data from ASCII and Excel have import limits of 254 characters of information per field. In Select Source File Type & Name section, chose the type of file from which you are importing.
In the File Name window, enter the complete path and file name of the source data file, or click on the browse button with three dots at the right of the window to browse to the source file.
Choose PastPerfect Table
In the Import into this PastPerfect Table section, choose the destination for the records you want to add. You can import data into the Objects, Photos, Archives, Library, Accession, or Contacts table.
These tables do not include any of the related tables, such as Condition Reports, Media (for images), or Dues and Donations for Contacts. This data must be manually entered, and images must be manually attached. You may import data into only one table at a time.
Fields to Import
The next option is to choose All or Selected fields to import. If you are importing data from dBase or FoxPro, you should select All fields. Data with matching field names will be put in the corresponding field.
Selected Fields to Import
If you import from an Excel or ASCII file, you must use Selected fields. Please click the Select Fields button to choose the fields into which you will import data.
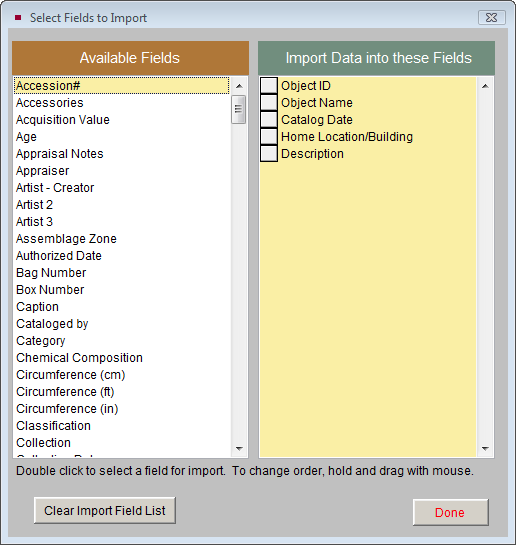
On the Select Fields to Import screen, shown above, double click on the field from the Available Fields column at left. The field name will be added to the right column of included fields. Continue adding fields for all of the data in your source file. To remove a field, double click on it so it returns to the list of Available Fields. Please make sure the order of the fields on this screen matches the field order from the input file. To change the field order, click and hold the gray box to the left of the field name, then drag it with your mouse to the new position. When the fields and the field order are set, click Done. You will notice that the field names appear separated by commas with no spaces.
For example: Objectid,Objname,Catdate,Homeloc,Descrip

Prepare Import
Then click the Prepare Import button. This will locate and analyze the source file and display information and options on the Pre-import Information screen. Options here allow you to exclude duplicate records or records with blank ID#s (it is recommended that you exclude these records). You may also narrow the selection of records by entering a Boolean filter statement.
Before importing, it is a good idea to Browse the records in the Import File Information section. This will give you the opportunity to ensure that the correct data from your source file goes into the correct fields in PastPerfect. The Browse Destination File button will allow you to see the PastPerfect records in the table into which you will be adding your records. Click Import Data Now to complete the process.
After the data is imported, you must do a reindex by clicking the Reindex button on the Main Menu. Please review your imported records before continuing to do data entry in any part of PastPerfect. If the data did not come in as expected, you can restore the backup you made before importing and try the import again.
Conversion Options
If you are not able or do not wish to import your data yourself, PastPerfect Software, Inc. offers conversion services, where we can import your data for you for a fee. Please consider having us assist you if you feel this is a larger project than you want to attempt.