Attaching Digital Images
PastPerfect provides an easy-to-use interface that will allow you to acquire images directly from a scanner, digital camera, or any other TWAIN compliant device. Once attached, images can be manipulated in a number of ways.
To attach or view images click the Image Management button in the upper right corner of the Objects, Photos, Archives or Library catalog screen, or on the Exhibits, Sites, People Biographies or Contacts screen. To attach an image to a condition report, first create the condition report on the catalog record, then click the Image Management button on the bottom of the report. The Image Management screen will display.
Each catalog record can have one or more images attached. The maximum number of images that you can attach to a single catalog record is 999. You may also attach images to condition reports, up to 999 images per report. Exhibits and Sites may have up to 20 images attached to each record. People Biographies and Contact records may have one image attached to each record.
PastPerfect will automatically assign a name to your image. This name is the Object ID number, with periods, dashes or other punctuation removed. For example, an image attached to a record with an Object ID of 2003.2.2 would be 200322.jpg. If you are attaching more than one image to a catalog record, PastPerfect will automatically add on a "-2", "-3", and so on to the subsequent image file names, in the order the images are added. For example, the second image attached to the record with the Object ID 2003.2.2 would be named 200322-2.jpg. The three numbers you see before the file name designate the image's subfolder.
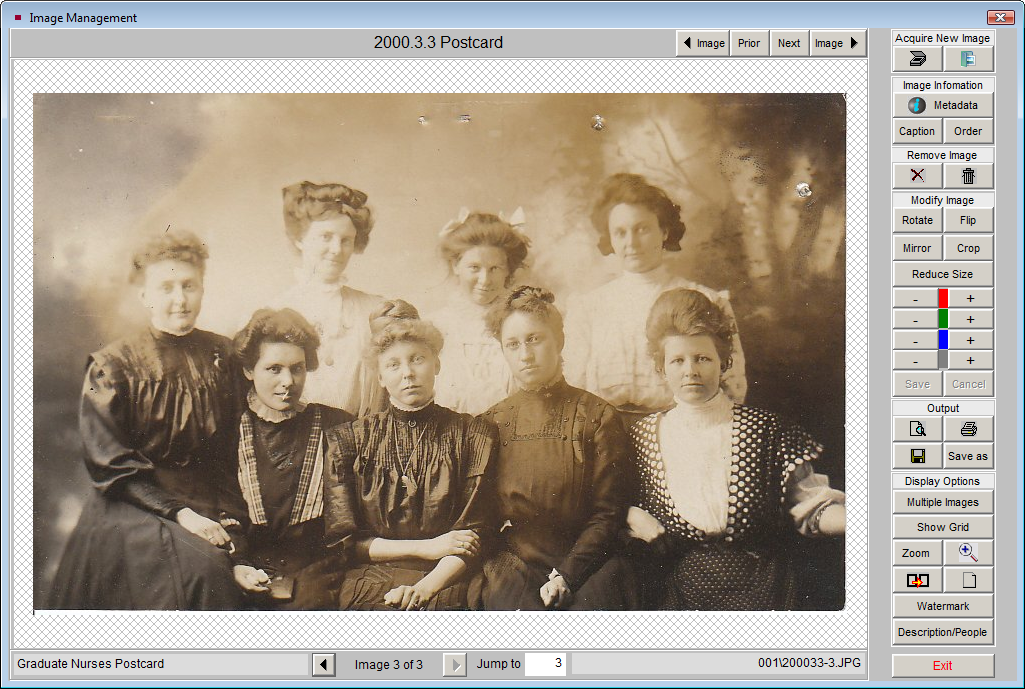
On the right side of the Image Management screen is the Image Management toolbar.
Image Management screen
Acquire Image from Scanner or Camera
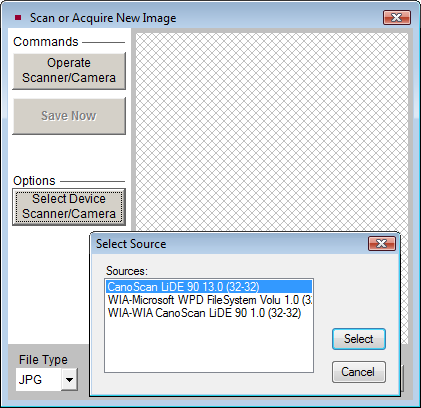
To acquire an image from your scanner, digital camera, or other TWAIN-compatible device connected to your computer, click on the Scanner icon at the top of the toolbar. If you have multiple devices connected to your computer, you may need to click the Select Device Scanner/Camera button to choose the device you want to use, as seen below. Next, click the Operate Scanner/Camera button.
NOTE: If you have images on a memory card from your digital camera, or your camera appears as a drive letter when you plug it in to your computer, please use the option later in this chapter to attach an existing image file.
Scanning an Image
The software that comes with your scanner provides the next screen, which displays a variety of options for scanning the image, including dpi resolution. The higher the resolution, the better the image, but the more memory required to acquire and display the image and the more hard disk space required to store it. For most applications, you will want to use a resolution below 200 dpi. Images scanned at 100-200 dpi are quite adequate for use with PastPerfect as discovery images. A good rule of thumb is to set the dpi so that the resulting image file size is about 100KB for JPG images, or 500KB for uncompressed TIF or BMP images. You will also want to scan your images, even black and white documents or photos, using the color setting, rather than grayscale or black and white. The color setting will allow your scanner to pick up all ranges of colors, resulting in a better image. You will also be able to apply watermarks to the image later on, if you choose.
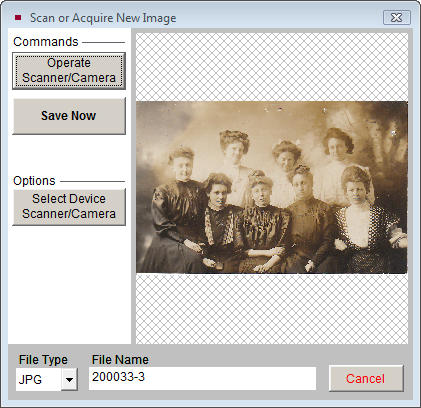
Once the image is scanned you will be returned to the Scan or Acquire New Image screen, seen below, where the image is displayed in thumbnail form. Be sure to complete the final step by selecting the desired file type and clicking the Save Now button.
Scanned Image
The default file type for saving images is selected on the Setup Multimedia Options screen. As you save each image, you can use the default setting or make a change under File Type. The image formats available are JPG, BMP, TIF, or PNG. JPG makes effective use of compression to store color or grayscale images. The advantage of compressed images is that they require much less storage space on your computer. Therefore, we suggest using the JPG format for your discovery images.
NOTE: If you attach an image that is over the archival image size specified on the Setup MultiMedia screen, you will receive a message telling you that a small discovery image has been created and attached to the record, and the large archival image will be linked as a Multimedia Link.
After you have saved the image, the Image Metadata screen appears as shown below. Here you can enter a caption for the image, display order, and metadata about the image file. Click OK to save the information. Once the image is saved, you will receive a message giving you the image file location and name, and the number of images in the current folder. Click OK to finish the process.
Image Metadata screen

Image Metadata Screen
The Image Metadata screen stores data about your image. Some fields will be filled in automatically, but others will need to be completed manually.
Original Object Size - Enter the dimensions of the item in the image. This gives viewers a sense of scale for the image.
Original Object Format - Enter the format of the item in your image, such as Negative if this image was created by scanning a negative, or Artifact if this is a digital image of a chair. This field is controlled by a drop-down menu authority file. The authority file can be added to and edited by going to the Main Menu | Setup | Authority Files | Imaging.
Negative Number - If the image was created from a negative, enter the negative number here.
Equipment Used to Acquire - Record the brand name and model of your scanner or digital camera here. This field is controlled by a drop-down menu authority file, which can be added to and edited by going to the Main Menu | Setup | Authority Files | Imaging.
Software Used to Acquire - Record the software program used to create the image. If the image was created in another program before attaching it to your record, such as Photoshop, enter it here. If the image was attached directly into PastPerfect, enter PastPerfect. This field is also controlled by a drop-down menu authority file, which can be added to and edited by going to the Main Menu | Setup | Authority Files | Imaging.
Settings and Resolution - Enter the camera or scanner settings used, including dpi or resolution.
Grayscale or RGB (color) - Record the color setting used when acquiring the image. This field is controlled by a drop-down menu authority file, which can be added to and edited by going to the Main Menu | Setup | Authority Files | Imaging.
Created by - Enter the name of the person who created the image file. This field is controlled by the Users authority file, which can be added to and edited by going to the Main Menu | Setup | Authority Files | Common Screens.
Date Created - Enter the date the image was created. This will automatically be filled in with the date the image was attached.
Location of High-Resolution Archival Image - If you have a high quality archival version of this image stored in another location, enter that location here. This may be a network drive, CD, or other location.
High-Resolution Image File Name (including path) - If you have a high quality archival version of this image, enter the path and file name for that image. You may use the button at the end of the field to browse to the location. Once the location is entered, you may use that button to view the image. If you attached an image that was considered an archival image by PastPerfect, determined by the size of the image file, this field will automatically be filled in with the path to the archival image in the Multimedia\Largeimages folder.
Copyrights - Enter any copyrights on the image.
Uncompressed File Size - Lists the size of your image in bytes, when uncompressed.
Actual Image File Size - Lists the size of your image in bytes, as it is stored on your computer. If the image is a JPG, this will be the compressed file size.
Height - Lists the height of the image in pixels.
Width - Lists the width of the image in pixels.
Format - Lists the detailed format of the image file.
Bits/Pixel - Lists the bit depth of the image file.
 Use this button to change your 8 bit image to a 24 bit image. If your image is 8 bit, you will need to do this to be able to watermark your images.
Image File Name - Lists the full path and image file name for your image. This is especially helpful if you need to find the image file outside of PastPerfect.
Include in Web - Check this box to include the image when uploading files for a PastPerfect-Online website. PastPerfect-Online is a product that enables you to create a fully searchable online catalog from PastPerfect records and images.
Fill New Entries from Last - Check this box to fill the Image Metadata screen with the same data that was entered for the last image added. This will apply to all images added after checking this box, but not to the current image. This can be a time-saver if you are adding multiple images for one item and the object format, equipment, software, created by and date fields are the same for all the images.
Restricted - Check this box to place an Image Restricted flag on the image.
View EXIF Information - If EXIF information was included with the image you attached from your camera, you may view the information by clicking this button. EXIF, or Exchangeable Image File Format, metadata may include the date and time the image was taken, camera model and make, camera settings, description, and copyright information.
View Detail Notes - You may enter and read more information about the image here.
Attach An Existing Image File
You may want to attach digital images that have been created outside of PastPerfect. These images may be on a CD, DVD, flash drive, network drive, or your computer's hard drive. If you have images on a memory card from a digital camera, or if your digital camera appears as a drive letter when you plug it in to your computer, this is the process to use to attach the images. PastPerfect supports the attachment of these image formats: BMP, JPG, PCX, PNG, and TIF. You cannot attach Progressive JPG images. To start, click the Attach New Image icon on the top of the Image Management toolbar.
 Click this icon to locate an existing image file on your hard drive, network, or removable drive. Then click on the image file you want to attach so it appears in the File Name field and click Open.
The Look in drop-down menu will help you locate the file. If you check the Preview box, you will see a thumbnail of the selected image before you attach the image by clicking the Open button.
NOTE: We suggest that you do not copy your images from your camera, CD, DVD or removable drive directly into the pp5\Images folders before attaching the images. PastPerfect will automatically make a copy of the image in its current location, rename it, and place it in the appropriate image folder for you. Copying the images into the pp5\Images folders before attaching them may lead to excess images in the folders, which can cause delays when making backups.
You will then be presented with the Image Metadata screen. Enter a caption and other metadata about the image and click OK to complete the attachment.