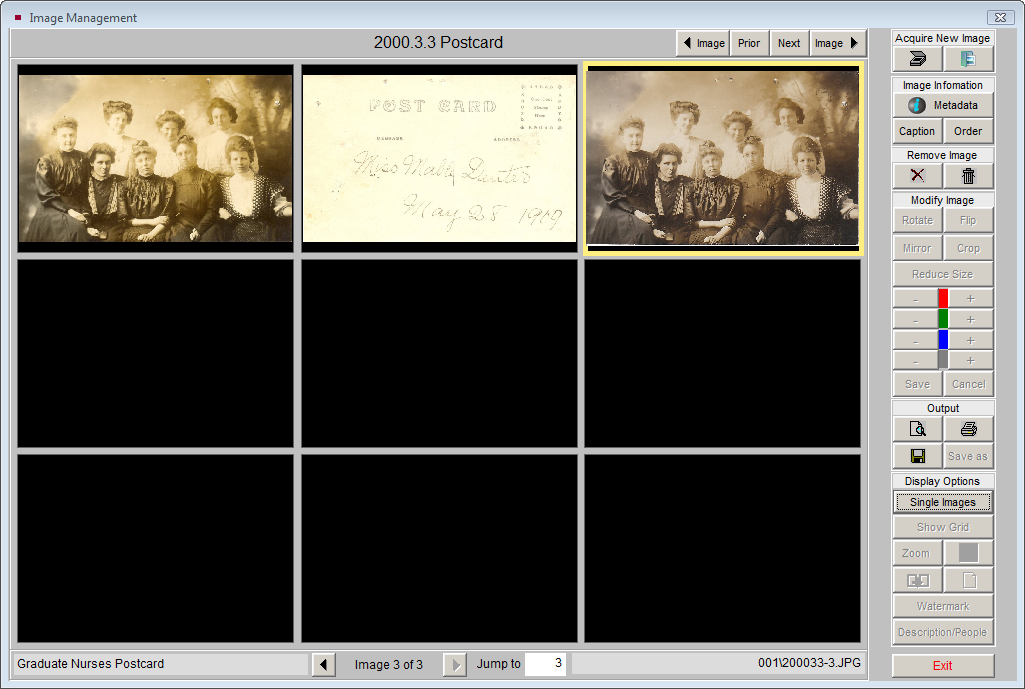
Image Manipulation
Once an image is attached, a variety of image manipulation tools are provided on the Image Management Toolbar. This toolbar, shown below is located on the right side of the Image Management screen. Here is a description of each tool.

Acquire New Image Tools
 Scan Image - Described earlier in this chapter.
 Attach Image - Described earlier in this chapter.
Image Information Tools
 Metadata - Displays information about the digital image, including file name, size, format, original object size, original object format, equipment used to acquire, resolution used to acquire, created by, date created, location of high-resolution archival image, and copyright information.
 Caption - Use this tool to add or change the image caption.
 Order - If multiple images are attached to one catalog record, use this tool to change the order of display. If you change the order of one image, please be sure to adjust the order of the other images accordingly so that no two images have the same order number. The image with order number 1 will appear on the catalog record as the thumbnail and print on reports.
Remove Image Tools
 Unattach Image - This tool will break the attachment between the catalog record and the image file. Using the Unattach Image button does not delete the image file. Use this if you want to remove the image from this record and attach the image to another record.
 Delete Image - This tool removes the image file from the record and deletes it from your PastPerfect Images folder. Use this if you want to remove the image from the record and you do not need to keep the image.
Modify Image Tools
These tools allow you to make changes to your image. After making a change, you must click Save to save the image with the changes. Save will overwrite the original copy of your image. To reverse your changes, click Cancel.
 Rotate - Rotates the image 90 degrees clockwise. Click the button multiple times to continue to rotate the image.
 Flip - This flips the image top to bottom creating an upside down reversed image.
 Mirror - This reverses the image left to right creating a backwards reversed image.
 Crop - This opens the crop menu. The Edge Crop can be used to crop a selected number of pixels from the edges of the image. The Mouse Crop can be used to draw a box with your mouse to select the area to retain.
 Reduce size - Use this tool to make the image smaller, reducing it by a percentage.
 Red hue - Use this tool to increase or decrease the red hue of the image.
 Green hue - Use this tool to increase or decrease the green hue of the image.
 Blue hue - Use this tool to increase or decrease the blue hue of the image.
 Darkness - Use this tool to lighten or darken the image.
 Save - Once changes have been made with the tools above, you must click Save to make them permanent.
 Cancel - Click this button to reverse any changes made to the image. This only works if you have not clicked Save.
Output Options
 Preview - Previews the print of the image. The Full Size Image report by default contains the object ID, object name, a full page image, and description from the catalog record.
 Print - Prints the Full Size Image report with the object ID, object name, full page image, and description from the catalog record.
 Save to Disk - This tool allows you to save a copy of the image file to your hard drive, network drive, or to a removable drive. Please note this option will not save the image directly to a CD or DVD.
 Save As - Use this tool to change the image file name or image type. Image types can be JPG, BMP, TIF, PNG, or PCX. You can use this tool to create a copy of the image by saving it with a different file name. This screen also gives you the option to save this image as the image that appears on the Objects, Photos, Archives, or Library button on the Main Menu. You may also choose to add or remove this image on the Main Menu Slide Show.
Display Options
 Multiple Images - PastPerfect allows you to attach up to 999 images to each catalog record. These may be displayed nine at a time in thumbnail version on the Image Management screen. Multiple images can be very useful in providing a variety of views of the same object.
To display all attached images nine at a time, click on the Multiple Images button. The screen will change to display nine images in grid format, seen below. To return to viewing one image at a time, click the Single Image button.
In the Archives Catalog, you can scan an entire multi-page document into PastPerfect. Using the small prior and next arrows below the image screen can give you a sense of turning the pages of the actual document. Please note that text in attached images is not searchable.
View Multiple Images
 Show Grid - This command superimposes a grid over the image. The grid ruler lines are in pixels. This can be useful when resizing images. To remove the grid, click the Show Grid button again.
 Zoom - Use this tool to open a small zoom window at the upper right corner of the screen. Use the mouse in the zoom window to pan the image. In zoom mode, vertical and horizontal scroll bars are enabled. To exit zoom mode and return the image to fit the screen click Zoom again. This tool may not allow you to zoom if your image is too small.
 Magnifying Glass - This will display a magnifying glass on the image that you can move with the mouse to enlarge selected portions of the image. To turn off the magnifying glass, drag it off the screen. To change the magnifying power, right click on this button. Note that depending on your computer's RAM, high-powered settings may require that the glass be moved slowly.
 Slide Show - This tool starts an automated slide show of images in the catalog. The display interval can be adjusted from one to twenty seconds. This feature can be particularly useful for automatically displaying all images in a catalog or images of records selected with a research query. To turn off the slide show, click the Stop Slide Show button.
 Optimize for Document Display - This tool will display images in the optimum size for viewing.
 Watermark - Allows you to apply a text watermark to the image. Please see the section for Applying a Watermark for more detail.
 Description/People - Displays the Description and People fields from the catalog record.
There are four other buttons at the top of the Image Management screen. They are:
 Prior/Next - These buttons display the next or previous catalog record, whether or not it has an image attached. Use the <Image and Image> buttons to display the previous or next catalog record that has an image.
Applying a Watermark
To ensure the security of your images, you may add your own watermark text. Once applied and saved, this mark cannot be removed from the image. To start, click Watermark on the Image Management toolbar, then click Setup Watermark.
Watermark Setup screen
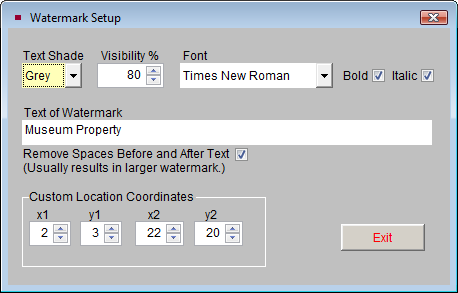
You can set a custom location for the watermark and define the watermark text on the Watermark Setup screen.
Text Shade - You may change the color of the watermark to either Grey or White, using this field. If the image has a dark background, a white watermark will be more visible.
Visibility % - Determines how strong the watermark is.
Font - You may change the font to Times New Roman or Arial, and also change the text style to Bold and/or Italic.
Text of Watermark - Enter or change the text of your watermark by typing it in this field.
Remove Spaces Before and After Text - Checking this box will help to increase the size of the watermark on the image.
Custom Location Coordinates - You may set your own coordinates to place the watermark exactly where you want it on the image.
TIP: The X coordinate is a given number of pixels along the horizontal axis. The Y coordinate is a given number of pixels along the vertical axis. X1 and Y1 are starting points relative to the upper left corner of the image. The greater the difference between X1/Y1 and X2/Y2, the larger the watermark. For instance with the coordinates X1=20, Y1=20 and X2=90, Y2=90, the watermark will be larger than if the settings are X1=40, Y1=40 and X2=60, and Y2=60. The X2 and Y2 coordinates must be larger than the X1 and Y1 coordinates.
Once you have set up your watermark, click Exit to save the settings.
To apply your watermark, choose the Location of Watermark. If you do not want to use the Custom Location Coordinates to place the watermark, you may use one of the standard locations. Please choose the location from the drop-down menu.
Apply Watermark screen
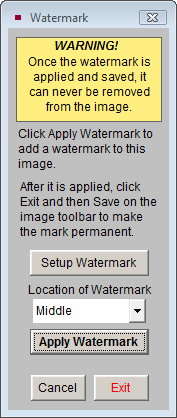
Then click Apply Watermark to place the text on the image. To increase the intensity of the watermark, click Apply Watermark repeatedly. When you are happy with it, click Exit to close the Watermark screen, then click Save on the Image Management toolbar. If you want to cancel the watermark, click Cancel on the Watermark screen or on the Image Management toolbar. Remember, after clicking Save, the watermark becomes permanent and cannot be removed.