Building the HTML
After you have created your exhibit, added catalog records and made your design choices, you are ready to build the HTML for your website. This is the process that takes the PastPerfect data and transfers it to a format readable on websites. Click the Build HTML button on the Sidebar to open the Create HTML Web Pages screen.
Create HTML Web Pages
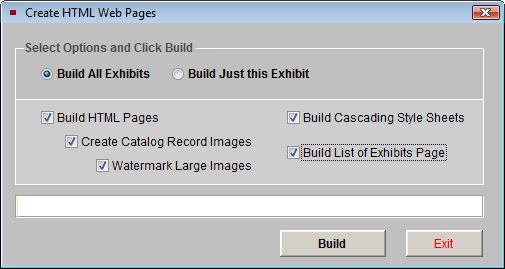
On this screen, you have options to Build All Exhibits or Build Just this Exhibit. To create the HTML for all the exhibits, use the Build All Exhibits option. If you only have one exhibit, or you were making changes to just one exhibit, you can choose the Build Just this Exhibit option. This option will save you time, as the building process may take anywhere from a few minutes to a few hours, depending on the number of records and images in your exhibits.
The other check boxes on this screen allow you to select which parts of the website are built. Since the parts work together, it is recommended that you select all the parts when you build your HTML, except for Watermark Large Images if you do not want your images watermarked.
Watermarking Images
During the HTML building process, the image files are converted to JPG format and are optimized for Web display. A thumbnail and a full size image are created for each catalog record. If you would like the full size images watermarked when they are created, check the box for Watermark Large Images. This watermark will only be applied to the full size images that appear on your website; your original images in PastPerfect will not be watermarked.
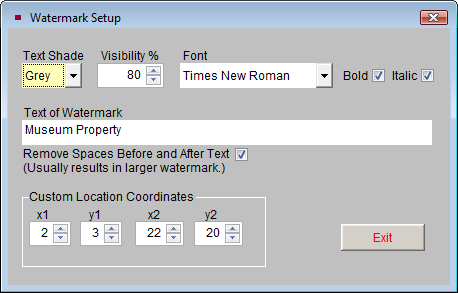
Watermark Setup screen
Watermarks are set up by clicking the Image Management button under the Image for Exhibit Page, found on the Catalog Records and Additional Exhibit Information screen views. On the Image Management screen, click the Watermark button on the bottom right, then click Setup Watermark. You can set a custom location for the watermark and define the watermark text on the Watermark Setup screen.
Text Shade - You may change the color of the watermark to either Grey or White, using this field. If images generally have dark backgrounds, a white watermark will be more visible.
Visibility % - Determines the prominence of the watermark.
Font - You may change the font to Times New Roman or Arial, and also change the text style to Bold and/or Italic.
Text of Watermark - Enter or change the text of your watermark by typing it here.
Remove Spaces Before and After Text - Checking this box will help to increase the size of the watermark on the image.
Custom Location Coordinates - You may set your own coordinates to place the watermark exactly where you want it on the image.
TIP: The X coordinate is a given number of pixels along the horizontal axis. The Y coordinate is a given number of pixels along the vertical axis. X1 and Y1 are starting points relative to the upper left corner of the image. The greater the difference between X1/Y1 and X2/Y2, the larger the watermark. For instance with the coordinates X1=20, Y1=20 and X2=90, Y2=90, the watermark will be larger than if the settings are X1=40, Y1=40 and X2=60, and Y2=60. The X2 and Y2 coordinates must be larger than the X1 and Y1 coordinates.
Once you have set up your watermark, click Exit to save the settings.
To apply your watermark, choose the Location of Watermark from the drop-down menu. You can use the Custom Location Coordinates or one of the standard locations.
Apply Watermark screen
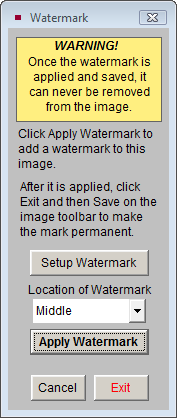
If you want to apply the watermark to the Exhibit Page image, click Apply Watermark, then click Exit and click Save on the Image Management toolbar. You do not have to apply the watermark to this Exhibit Page image to be able to watermark your Catalog Record Page images. If you want to apply the watermark to just Catalog Record Page images (and not the Exhibit Page image), do not click Apply Watermark. If you applied the watermark to the Exhibit Page image and you want to remove it, click Cancel on the Watermark screen or on the Image Management toolbar.
To apply the watermark to your images during the Build HTML process, check the box next to Watermark Large Images. Then click Build.