Step 6: Enter Workstation Settings
If PastPerfect is installed on a stand alone computer, then the settings on this screen apply for your PastPerfect program on that computer. If PastPerfect is being used on a network, these settings can be different for each computer where PastPerfect is installed. The settings will apply for all PastPerfect users who use the same computer. Changes made on this screen are saved when you exit the screen.
Setup Workstation Settings screen
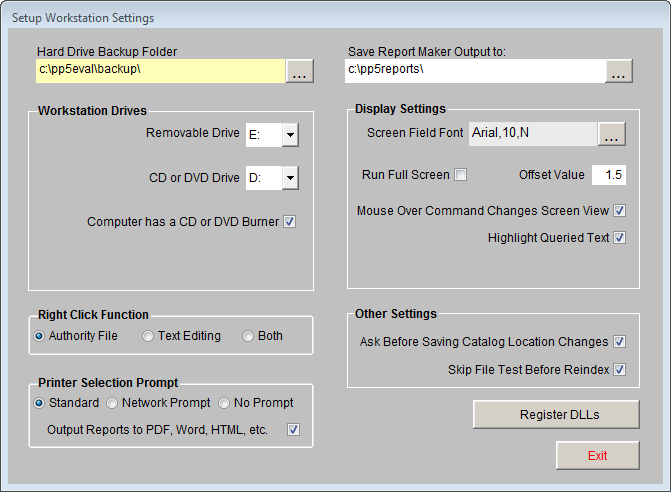
Hard Drive Backup Folder - By default this is set to c:\pp5\backup\. This is the location on your hard drive where data backup files will be placed when you select Hard Drive Backup from the Backup & Reindex section of the Main Menu. We recommend that you use the default setting, even if this computer is a workstation on the network. It is best to have the backups saved locally rather than on the file server where the data already exists. This system creates multiple backups, with each workstation making a compressed copy of the data on the server and storing it on the local hard drive.
Removable Drive - This is the drive where data backup files will be placed when you select Removable Backup from the Backup & Reindex section of the Main Menu. It is the drive letter of your flash drive, external hard drive, or zip drive. You can find this letter by plugging in your drive, then opening your Computer screen. The drive should be listed as a Removable Disk or Device.
CD or DVD Drive - This is the drive where data and image backup files will be placed when you select CD/DVD Backup from the Backup & Reindex section of the Main Menu. Select the drive letter for your computer's CD or DVD drive that has writing capabilities. You can find this letter by opening your Computer screen. The drive should be listed as a CD or DVD Drive.
Computer has a CD or DVD Burner - Place a check in this box if your computer has CD or DVD writing capabilities, to allow PastPerfect to make backups to a CD or DVD. If you do not check this box, the option for CD/DVD Backup on the Main Menu will be restricted.
Right Click Function - When in Add or Edit Mode, right clicking your mouse can have different functions. If set to Authority File, when you right click on a field with an authority file, it will open that file. If set to Text Editing, when you right click on a field it will open the Edit | Copy and Paste menu. A setting of Both will open authority files when selecting authority controlled fields and open the Edit | Copy and Paste menu when selecting non-authority controlled fields.
Printer Selection Prompt - Three options are available. Generally you will want to use the Standard option which will open the familiar pre-print window where you can select the printer, properties, and number of copies to print. The second choice of Network Prompt may be required on some networks that only allow you to print to the default Windows printer. With this option you can select the default Windows printer before printing. The third option for No Prompt may be convenient if you want to skip the pre-print window.
Output Reports to PDF, Word, HTML, etc. - With this box checked, any time you click the Print button in PastPerfect you will see another dialog box that allows you to choose the output for what you are printing. The options are PDF, MS-Word, HTML, and plain text in addition to sending the report to your printer. By default this setting is checked. If you do not wish to have multiple output options when printing reports, please uncheck the box.
Save Report Maker Output to - When using the above function to output reports to PDF, Word, HTML, or plain text, you can specify the location where the files are saved in this field. This also applies to reports exported to Excel, and those created with Report Maker where you have selected to have the output sent to a dBase, Excel, or ASCII file rather than the printer. The default location is the c:\pp5Reports folder.
Screen Field Font - Select the font name, font size, and font style for the data you enter into fields. This setting will apply to the main screens in PastPerfect. Please note that using larger font types or a font size greater than 10pt may cause some data fields to truncate the display of information.
Run Full Screen - Checking this box will allow PastPerfect to run without having the outer file window behind the program. You will not have the ability to minimize or maximize PastPerfect when this is turned on. You must close and re-open PastPerfect for this function to take effect.
Offset Value - Works in conjunction with Run Full Screen, to shift the PastPerfect screen up on your monitor with a higher number, or down with a number lower than the default of 1.5. Most users do not need to adjust this offset. You must close and re-open PastPerfect for this function to take effect.
Mouse Over Command Changes Screen View - Checking this box allows you to move your mouse over any of the Screen View buttons on catalog records and see the fields in that Screen View. If this box is not checked, you must click the Screen View button to see the fields in that view.
Highlight Queried Text - When you run a query or field search, PastPerfect can highlight the specified text in the queried field to make it easier to find. Uncheck this box if you do not want the text highlighted.
Ask Before Saving Catalog Location Changes - Check this box to have PastPerfect prompt you before saving a location change in the Location History file. If the box is not checked, location changes will automatically be saved in the Location History.
Skip File Test Before Reindex - Turns off the automatic File Test before running a Reindex. We recommend that you leave this unchecked unless performing the File Test is problematic on your computer or network.
DLL Registration - This button allows you to manually register files that may not have been registered during installation. It should only be used under instruction from the PastPerfect support team.