Accession, Loan, or Return the Items
The next step depends on whether the museum decides to accession the items held in Temporary Custody, keep them temporarily as an incoming loan, or return or dispose of them. Please find the receipt by using the Find button or Browse button. You can find a particular receipt by the receipt number, donor (Source), or type of acquisition (Received as, i.e., donation, purchase, exchange, etc.).
Another way to find receipts is to click Browse at the top of the screen. A list of Temporary Custody receipts will appear. Right click on the receipt you wish to view, or left click on the receipt to select it then press the Enter key on your keyboard.
To exit the Browse screen without choosing a record, just click the "X" in the upper right corner of the screen or press the Esc key on your keyboard.
Return Items
If items are to be returned or disposed of without becoming a loan or entering the permanent collection, click the Transfer to Returned File button in the Actions section on the Sidebar.
Temporary Custody Return screen
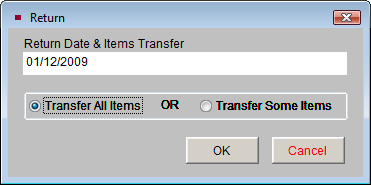
In the field below Return Date & Items Transfer, please enter the return date. You will then be asked if you plan to Transfer All Items or Transfer Some Items. If you select Transfer All Items, the record will be stored and displayed in the Returned file.
Transferring Some Items to the Return File
Selecting Transfer Some Items and clicking OK will bring up the Partial Return screen. This screen allows you to choose which items you wish to keep and which items you wish to return to the donor. A list of all items in the description of your Temporary Custody receipt will appear in both columns. If you plan to keep a specific item or items, remove those items from the "Description of Items Returned" column. For items you plan to return to the donor, remove those items from the "Description of Items NOT Returned" column. In the end, both columns should no longer contain the same items.
Using this screen will create an additional record to track the returned item(s). The returned item(s) will be given the temporary receipt number plus point one (.1). The original temporary custody receipt retains the original receipt number but no longer shows the returned items on the receipt. The items you plan to keep will need to be accessioned or accepted as an incoming loan.
Temporary Custody Partial Return screen
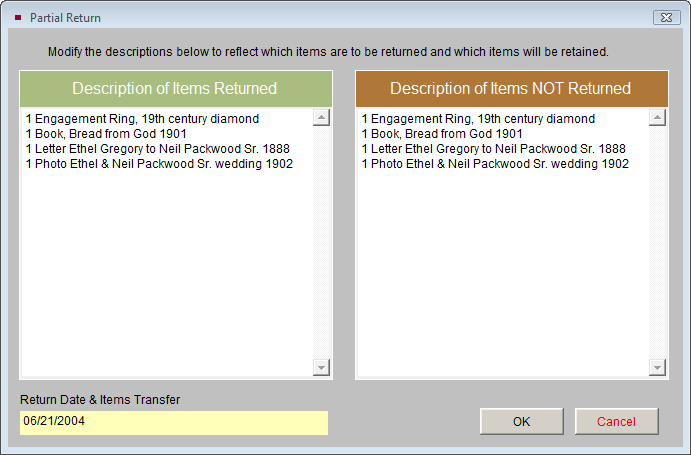
Leave the items to be returned in the Description of Items Returned column and delete the accepted items. Leave the accepted items in the Description of Items NOT Returned column and delete the items to return.
New Accession or Incoming Loan Screen
Should your museum agree to accept the items into the collections, you will click on the Accession or Loan button in the Actions section on the Sidebar. A screen labeled New Accession or Incoming Loan will appear, beginning the accession (or loan) process. Enter the accession or loan number and choose Transfer All Items or Transfer Some Items, then click OK.
If you selected Transfer All Items, the program will automatically create the new Accession or Incoming Loan record. For Accessioned records, the next screen will be the Update Donor's Name screen. This enables you to specify the source's name in the Deed of Gift form, Thank You Letter address, and Thank You Letter Dear field. Then you will see the new Accession or Incoming Loan screen where you can click Edit to enter additional information. The associated Temporary Custody record will be moved from the Active file to the Accessioned or Loaned file.
If you select Transfer Some Items and click OK, the Partial Accession or Incoming Loan screen appears. All items will appear in both the Description of Items Accessioned/Loaned and Description of Items NOT Accessioned/Loaned columns. For the items you plan to keep, please delete them from the "NOT Accessioned/Loaned" column. For the items you plan to return, please delete them from the "Accessioned/Loaned" column. Once you click OK, you will begin the Accession or Loan process. The items you plan to return will still be in the active Temporary Custody record, and you will need to transfer them to the returned file to complete the temporary custody process.
If you wish to cancel the transfer and return to the Temporary Custody screen, click on the Cancel button.
Multiple Donors
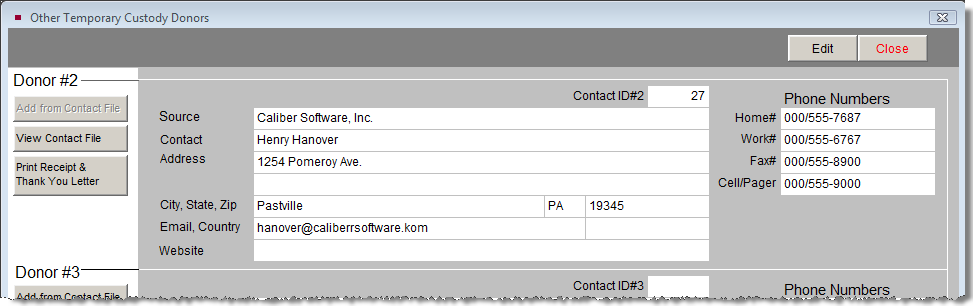
You can record information for up to three additional donors for a Temporary Custody receipt. A separate receipt and thank you letter may be printed for each donor.
To add another donor, click on the Add/View Additional Donors button in the More Screens section at left. Click Add from Contact File to select a donor from your Contacts database or type the donor information. If you add an additional donor, a green data light will appear on the Add/View Additional Donors button to indicate there are additional donors for this receipt.
Other Temporary Custody Donor screen