Adding New Accession Records
Each accession must have a unique accession number to distinguish it
from other accessions. Accession numbers can include numbers, letters,
and punctuation. PastPerfect recommmends assigning two-part numbers, such
as 2017.1, where the first four digits represent the year of the accession
and the next digits identify the chronological order of the accession
in the year. However, PastPerfect will support any numbering system your
institution may already have in place.
Before adding a new accession, we recommend you enter the donor into
Contacts. Accession documents, such as the Deed of Gift and Thank You
Letter, will not be available for a donor unless the donor exists in Contacts
and is linked to the accession record. See Adding
New Contact Record for details.
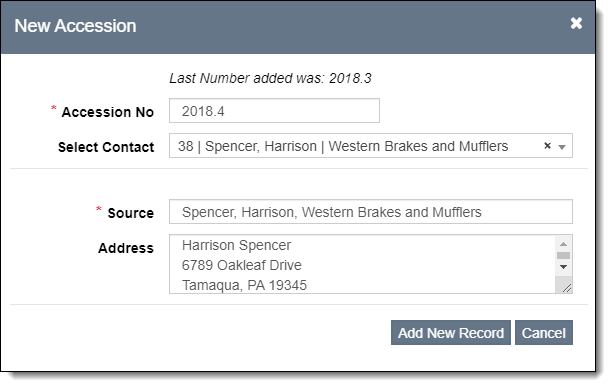
Add New Accession Record
- Click "New Record" on the Accessions Query screen or
on an existing Accession record
- Populate the required fields: Accession
Number and Source
- The Accession No must be unique. The Last Number added will
be displayed for your reference.
- To select the donor from Contacts, click the down arrow for
Select Contact and begin
typing the donor's name. This will automatically fill in the Source and Address.
A link will be created between the Contact record and this Accession
record.
- If the donor does not exist in Contacts, type the donor's name
in Source and fill in
the donor's name and address in Address
- Click "Add New Record"
- Populate other fields if desired
- It is recommended to populate the Description
of Items field so it can be used on the Deed of Gift and
Thank You Letter.
- If you place a check in the box for "Display restricted
flag on associated catalog records", a flag will appear on
the Object, Photo, Archive, and Library records that the items
are "Restricted by Accession."
- Click "Save" in the Edit Bar at the top of the screen
Add
Additional Donors
If there is more than one donor for an accession, additional donors
can be added to the Accession record. Be sure the additional donors exist
in the Contacts file (see Adding
New Contact Record).
- Click "Edit" in the Edit Bar at the top of the Accession
Record screen
- Click "Add Additional Donor" above the Donors Grid
- Browse or filter to find the donor(s) from Contacts that you want
to add:
- Browse using the page buttons at the bottom of the pop-up window.
Records can be sorted by clicking on a column header.
- Use a filter to find the donor(s) (see Working
with Filters).
- Using the check boxes to the left, select the donor(s) and click
"Add All Checked Records."
- The contact(s) will be added to the Donors Grid on the Accession
screen
- Click "Save" at the top of the screen
The first contact selected when the Accession record was created will
remain as the "Source" at the top of the screen.
Remove Donor from Record
If the wrong donor was accidentally added to an accession record, you
can remove them from the Donors Grid using the steps below. If the donor
you want to remove was the first one selected, you may also need to change
the Source, Primary Contact, and Address fields in the Top Section of
the record.
- Click "Edit" in the Edit Bar at the top of the screen
- Hover over the donor you want to remove in the Donors Grid
- Click the Trash Can icon on the far right
- Click "Yes" to confirm
- Click "Save" in the Edit Bar at the top of the screen