PastPerfect includes an editor for creating short identification labels for the items in your exhibits. An identification label often contains details such as title, creator, date, material, scientific name, object ID, and credit information. The credit line is typically provided last and in the smallest typeface.
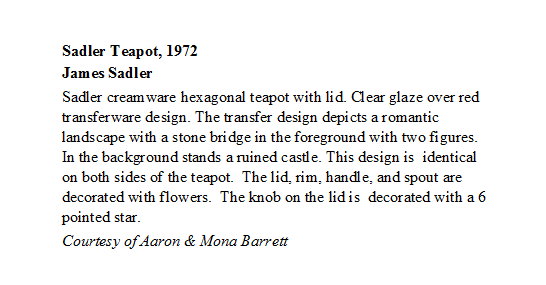
In creating labels, you should concentrate on what is most important to visitors. A good identification label does not have to include everything you know about the object. Rather it should include, in a simple, readable format, what a visitor might want to know. In most cases, a visitor wants to know what the item is, where it came from, how old it is, and what it is made of. An exhibit label for the teapot might look like the following example:
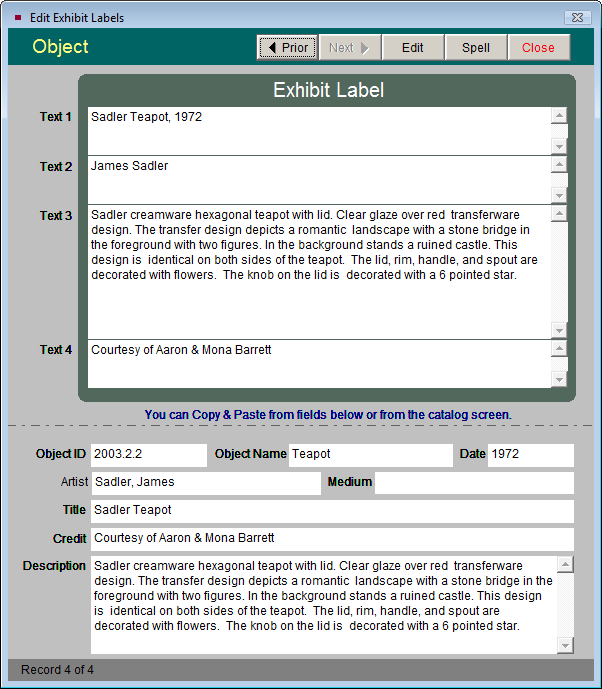
To create exhibit labels through Exhibits, click on the Edit Exhibit Labels button in the Actions section of the Sidebar. At the bottom of the screen, the editor includes some of the common fields used in creating identification labels. After clicking Edit, you can copy and paste information from these fields into the exhibit label or enter your own text. Click Save when you have finished creating the label.
TIP: To copy and paste text in PastPerfect, use the Windows keyboard shortcuts for Copy and Paste. To copy text, highlight the text you want to copy. Then hold down the "Ctrl" button on your keyboard and press the "C" button on your keyboard. This will copy the text to the Windows clipboard. To paste text, make sure you are in Edit Mode, then click to place the cursor where you want the text to be inserted. Hold down the "Ctrl" button on your keyboard and press the "V" button on your keyboard.
Edit Exhibit Label
You may select a different font style and font size for each of the four sections of the label. To learn how to customize your exhibit labels, refer to Chapter 19 - Advanced Report Modifications for instructions on modifying reports.
When you have created exhibit labels for each item in the exhibit, return to the main Exhibits screen. To print your exhibit labels, click on the Print button in the Navigation Bar at the top of the screen. Please choose the Print Exhibit Labels radio button, then click Preview. You will see the preview screen. If the labels meet with your approval, click the Print button.
The exhibit label text is stored with the catalog record after the exhibit is closed. The next time the item is used in an exhibit, you will not have to re-create the label. You may also edit the exhibit label on the catalog record. The Exhibit Options, including the exhibit label, are found on the catalog record by clicking the Location button in the Sidebar. Exhibit Options appear on the bottom right.
Preview Exhibit Label
