Creating a New Report
From the Report Maker screen, you can create new reports. When creating a report, you can either create it from scratch or you can copy an existing report and then modify it. The steps below are an overview of how to create a new report from scratch; following it are detailed explanations of each screen.
To create a new report:
- Select the Report Maker button on the Main Menu.
- On the Report Maker screen, select the Report Type for the report and click Create New Report.
- On the Report Description screen, enter a report name, the title to be printed on the report, description, and creator, then click Next. You will be taken to the Build Filter Statement screen.
- Create up to seven filter statements to select which records will appear on the report. Click Next to advance to the Select Fields to Include screen.
- On the Select Fields to Include on Report screen, pick the fields to appear on the report. When done, click Next to advance to the Select Sort Order Fields screen.
- On the Select Sort Order Fields screen, choose the field or fields by which the report will be sorted. Click Next to move to the Report Output Options screen.
- On the Report Output Options screen, you may preview, print, or export your report. You may also change the report layout.
- After printing or exporting the report, click Exit. You will be asked if you want to save the report. Click Yes if you want to save the report in the list of reports in this Report Type. Click No to discard the report and to return to the Report Maker menu.
Below are descriptions of each screen used when creating and modifying reports, and instructions for how to use them.
Report Description Screen
The Report Description screen is where you enter the Report Name and Report Description. These are for your reference, so you and other PastPerfect users at your institution can easily identify reports. The Report Name is a required field. This is the name that will appear on the Report Maker Menu and the Reports Menu.
The Title as Printed on Report field will be automatically filled in with the Report Name. If desired, you may enter a different name in this field that will print on the report. It is suggested that you fill in the Created by field with your name to help you and other users identify the report later on. This field is controlled by the Users authority file. To access the authority file, right click or press F7 on your keyboard.
Report Description screen
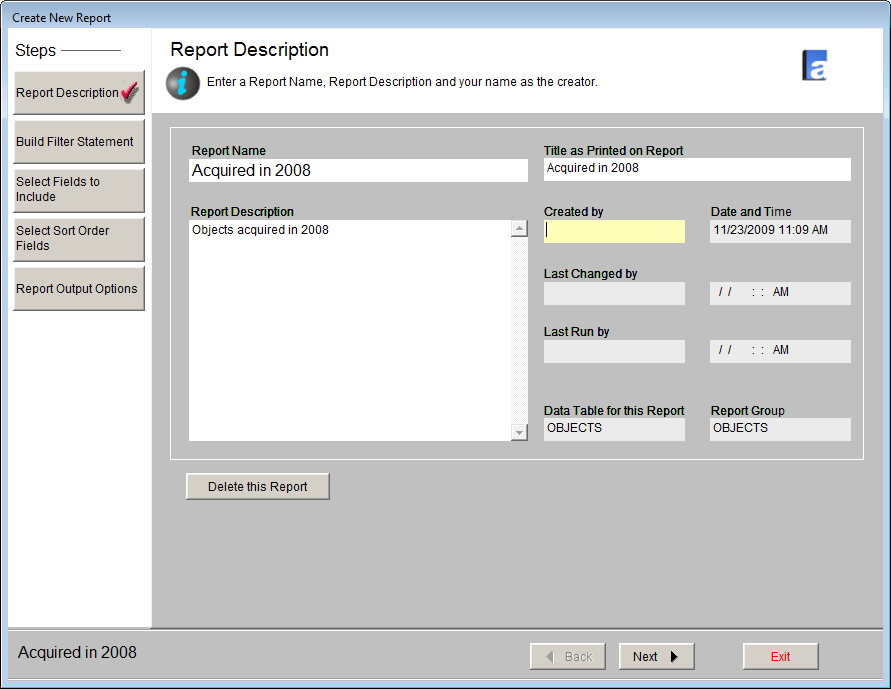
The other fields on this screen will be filled in and updated automatically. Click Next to advance to the Build Filter Statement screen.
TIP: You may jump to other steps in the report creation process by clicking the button for the desired step in the Sidebar on the left side of the screen.
Build Filter Statement Screen
Every report is designed to extract a specific subset of information contained within your database. The Build Filter Statement screen is where you specify a set of conditions to determine the subset you are seeking. This set of conditions is your filter. The process of creating your filter statement is the same as running a query in the Research, Catalog Lists and Contacts Lists sections of the program.
Build Filter Statement screen
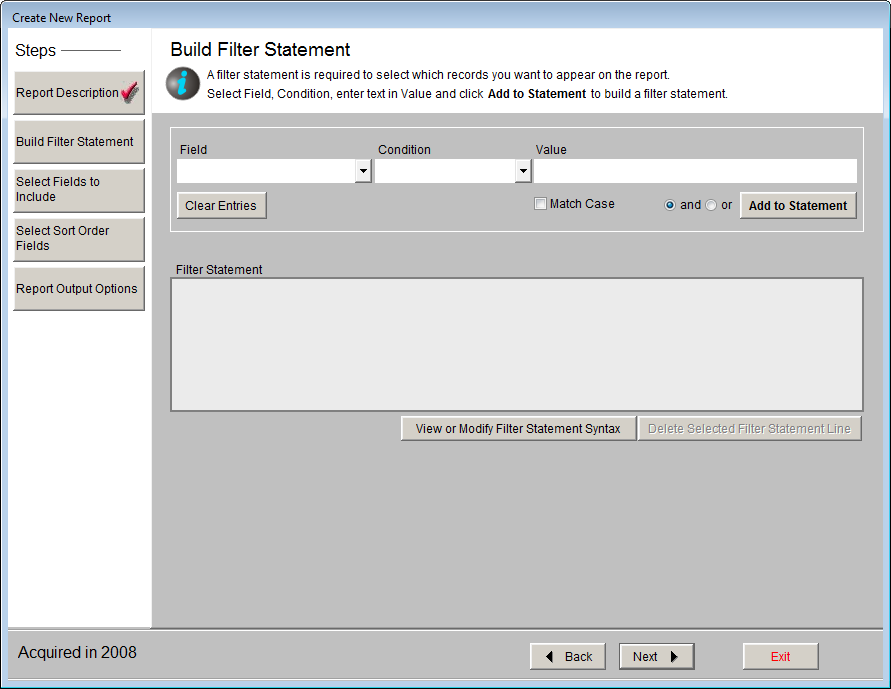
The Build Filter Statement screen allows you to build a filter statement from field and condition drop-down menus and using "and" and "or" operators to either narrow or expand the query.
Simple Filter Statements
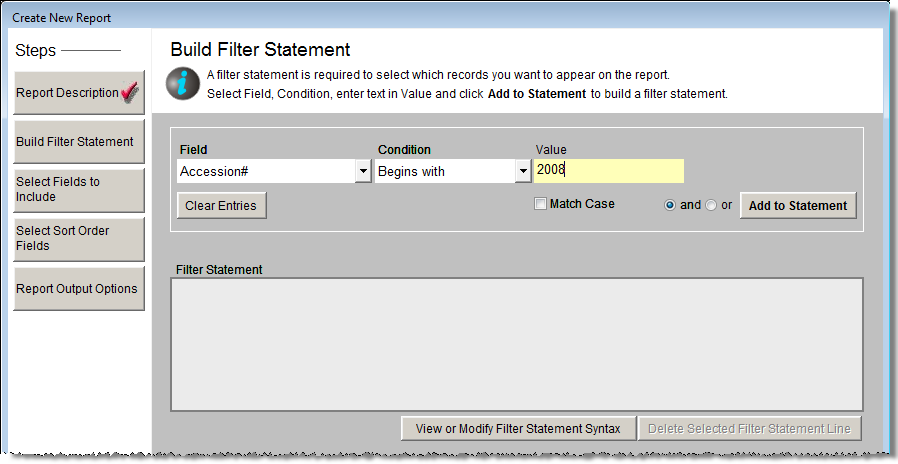
To begin, choose one of the fields from the Fields drop-down menu. Then use the Condition drop-down list to pick from choices such as "Begins with," "Contains text," "Greater than," "Greater than or equal to," "Less than," "Less than or equal to," "Is empty," "Is within list," and "Does not contain text" to start the filter statement.
TIP: You may choose the fields that are available in the Field drop-down menu by going to the Main Menu | Setup | Report Maker Fields section.
In the Value box to the right of Condition, enter the word or words (or dates, numbers, etc.) you want to find; capitalization is not important unless you check the Match Case box. Depending on the field being searched, you can access the authority file for that field. The authority file icon will appear in the upper right corner if an authority file is available. You may right click in the field or press F7 on your keyboard to access the authority file.
Click on the Add to Statement button to add this filter statement to the query. It will appear in the Filter Statement field below. If this filter is sufficient to find the data you need, click Next at the bottom of the screen.
Example Filter Statement
Complex Filter Statements
If additional conditions must be met to find the records you seek for this report, you may continue adding conditions. In the Field drop-down menu, select another field, choose a Condition from the drop-down list, and enter a Value. Next, you must select an AND or OR connector.
AND/OR Connectors
If your filter includes more than one condition, the conditions will need to be strung together with AND or OR connectors. How you connect the various conditions makes a big difference in the results. Let's look at an example of connecting two filters, "material equals wood" and "collection equals Rocky Pine Ranch Collection," with AND and OR.
AND - In the example "material equals wood AND collection equals Rocky Pine Ranch Collection," every record included in the results must meet both conditions. The material must be wood and the collection name must be Rocky Pine Ranch Collection. Rule: The conditions on both sides of the AND connector must be true.
OR - In the example "material equals wood OR collection equals Rocky Pine Ranch Collection," records included in the results can meet either condition, not necessarily both conditions. The results will show all items made of wood and all items with the collection name Rocky Pine Ranch Collection. Some items may meet both conditions, but items can still be included if the material is wood and the collection is something other than Rocky Pine Ranch Collection; alternately items can be included if the material is something other than wood, as long as the collection is Rocky Pine Ranch Collection. Rule: Only one side of the OR condition must be true.
Once you have selected your operator, click Add to Statement. Continue adding statements and choosing operators as needed. If you wish to edit or remove a line of your filter statement, click on that line, then click the Delete Selected Filter Statement Line button, directly underneath the filter statements.
View or Modify Filter Statement Syntax
If you have a complex filter statement with AND and OR connectors, you may need to modify your filter statement further to get the results you need. By clicking the View or Modify Filter Statement Syntax button, you can view the Boolean statement that PastPerfect uses in your filter. The filter in this syntax will look different from the filter statement you built from the drop-down menus. To modify this statement, click the Edit button on the Filter Statement screen.
The most common modification needed for complex statements with AND and OR connectors is inserting parentheses. The placement and organization of these parentheses can make a difference in the results. If you create queries with AND and OR conditions, use parentheses to ensure you get the results you are expecting. Parentheses dictate how the query is interpreted. The query is evaluated first in the innermost parentheses. Without parentheses, the query conditions are evaluated from left to right and top to bottom.
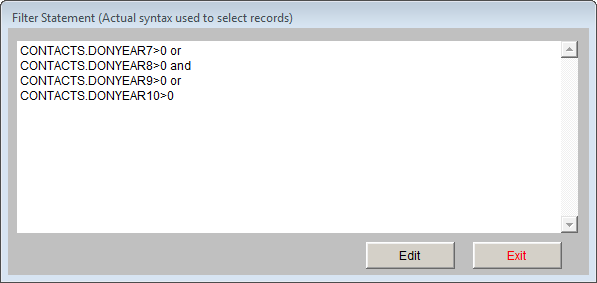
For example, say you want to find the contacts who made monetary donations in either 2006 or 2007 and in either 2008 or 2009. You would create your report in the Contacts Report Type and your filter statement before adding parentheses would look like the filter below.
Example Filter Statement
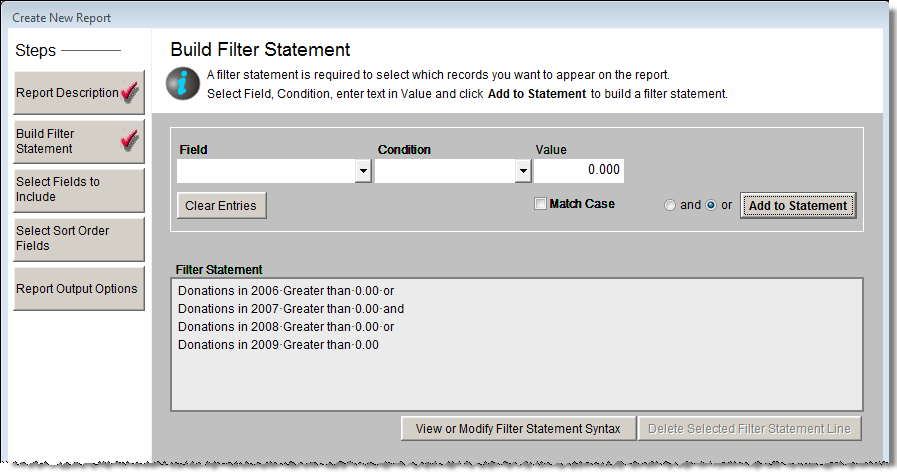
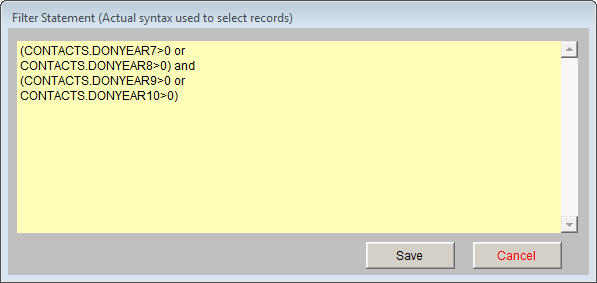
If you run the report with this filter, you may get people on the report who did not give in either 2008 or 2009. To get the results you want, you will need to insert parentheses. Since you want contacts who donated in either 2006 or 2007, we will need to group those together with parentheses so that PastPerfect looks at them as one condition. The same must be done for donations in 2008 or 2009. Then these two conditions will be joined with "and." To edit the filter, click View or Modify Filter Statement Syntax to view the statement. It will look like this:
To add the parentheses, click Edit. Click in the Filter Statement field, then type in the parentheses in the appropriate locations. The filter will look like this:
Inserting the parentheses forces PastPerfect to look at the first two conditions together so that contacts who made donations in 2006 or 2007 are considered for the report. Then it looks at the last two conditions so that contacts who made donations in 2008 or 2009 are considered. Once it finds those two groups of people, it includes only those contacts who are in both those groups because there is an AND between them. PastPerfect evaluates the conditions in parentheses first, then evaluates the conditions outside (or in this case between) the parentheses.
Click Save to save your modifications, then click Exit to close the Filter Statement screen.
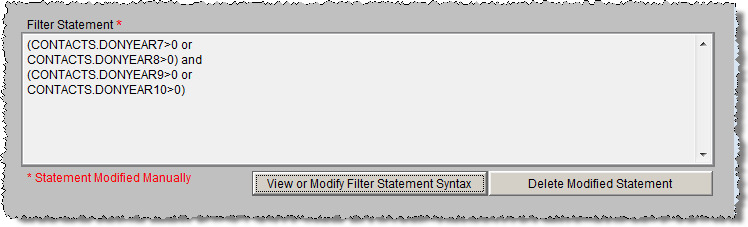
A note appears below the statement indicting it has been manually modified. Once a filter has been manually modified, you can continue to modify it manually. If you want to add or delete a condition, you must do it manually. If you add another condition using the drop-down fields, your modifications will be erased and the condition will be added to the original filter statement. If you select a line of the modified filter statement and click Delete Selected Filter Statement Line, the entire filter will be deleted.
Statement screen
Once your filter statement is finished, click Next to advance to the Select Fields to Include screen.
Select Fields to Include on Report Screen
When you design your report, you need to think about what information you want to include in the results. In most cases, you won't need to see every field in the database. The Select Fields to Include on Report screen is where you specify the fields you want to see on the report.
To choose a field, double click on it in the list of Available Fields on the left side of the screen. It will appear in the right column for Fields to Include on Report. To include images on the report, choose Image (picture). As you select the fields, you establish the order in which they appear on the report. You may change the order of the fields by clicking the grey box to the left of the field name and dragging it up or down until it is in the correct order. If you want to delete a field that you have selected, double click on it and it will return to the list of Available Fields. To start over, click the Clear List button to the right of the Fields to Include column.
When the fields to appear on the report have been chosen, click Next.
TIP: The fields in the Available Fields list are selected by going to the Main Menu | Setup | Report Maker Fields section.
Select Fields to Include on Report screen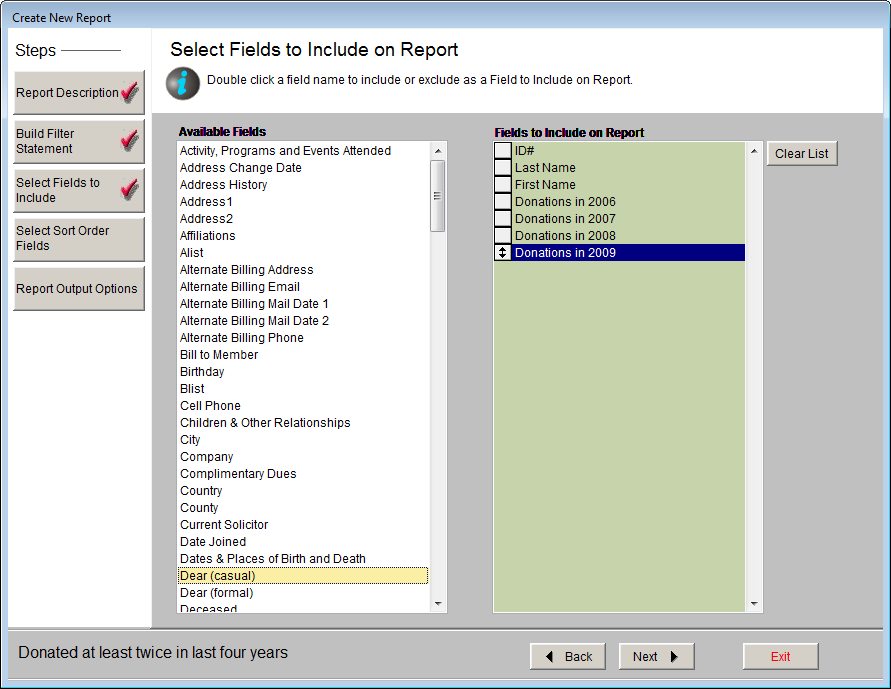
Select Sort Order Fields Screen
The Select Sort Order Fields screen lets you determine how your results will be sorted. To select a sort field, double click on it in the list of Available Fields. It will appear on the list of Fields to Sort by. You may specify up to five different sort fields. To start over, click the Clear List button.
Select Sort Order Fields screen
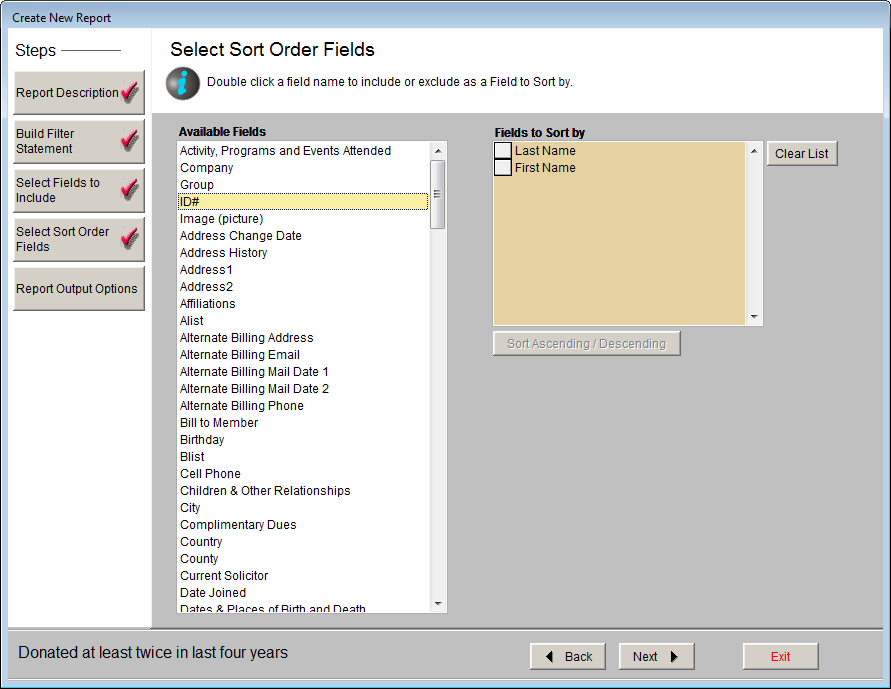
Sort Ascending/Descending - You can sort by a selected field in either ascending or descending order. (The default is ascending.) To change the order, highlight a field in the list. Click Sort Ascending/Descending to toggle between ascending and descending order. If you have specified descending order, then the "~Descending" indicator appears next to the field. If you have specified more than one sort field, changing the status of ascending or descending does not move fields to a different position in the list. (The first field in the list is sorted before the second, and so on.)
Once your sort order fields are selected, click the Next button.
Report Output Options Screen
Report Maker lets you send the results to a variety of formats, including printed reports, MS-Excel, MS-Word, PDF, HTML, database, text, and XML files. Alternately, you can view your results on screen without writing the results to another format.
Report Maker Report Output Options screen

When you first create a report, the default report output is a column layout report in either portrait or landscape orientation (whichever best fits with your chosen output fields). Upon clicking Next on the Select Sort Order Fields screen, you will see a message telling you your report was created in either portrait or landscape orientation. Click OK on this message. You will now have access to all the options on this screen.
Preview - Previews the report in the selected layout.
Report Output Options screen

Print - Clicking the Print button on the Print Reports screen will display the Print Report Output Options screen. From this screen you may send your report to a printer, or choose other formats for your report.
You can change your printer options by selecting Printer and Display Options Screen. When you click Run Report, you will see your printer's dialog box where you can select other printers or change your printer options.
If you would like to create your report in PDF format, MS-Word, HTML, or Plain Text, click the radio button next to the desired report format. The Output File Name at the bottom of the screen will display the name of the report that will be created. You may change the name by typing in the field, but it is not suggested that you change the file extension. The Output File Location field will display the location on your computer or network where the report will be saved. You may change the location by clicking the button with the three dots and choosing a different location. To create the report, click Run Report. Then navigate to the location where the file was saved to view the report.
Export to Excel - Click this button to export the report results to MS-Excel. The file will open in HTML using your computer's MS-Excel. The file is saved in HTML (.htm) format and stored in the PP5Reports folder on your local hard drive (usually C:/). If you wish to save it as an XLS file, go to the Save As function in the Excel File menu and choose "Microsoft Office Excel Workbook" as the file type. This Excel file will contain the selected output fields in the selected sort order for the resulting records.
Export to Table - This button will create a dBase file (.dbf) containing your report results. The file stored in the PP5Reports folder on your local hard drive (usually C:/). This file will contain the selected output fields in the selected sort order for the resulting records.
Advanced Layout Settings
If the default report layout for the previewed or printed report does not have the appearance you want, you may modify the layout. You have the option to change the Report Layout, Report Orientation, Report Subtitle, and When Report is Run options.
Report Layout
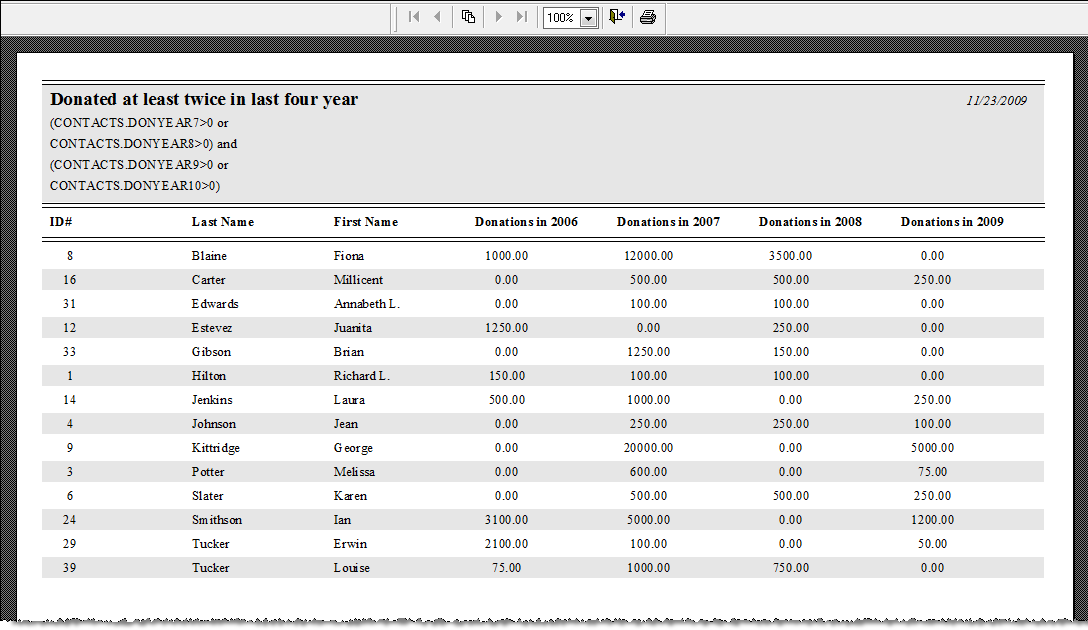
The most common and default report type is Report in Column Layout. On this report, each field is listed as a column. This report is great if you have only a few fields. Creating a column report with more fields than will fit across the paper will result in some fields being excluded.
Example Report in column layout
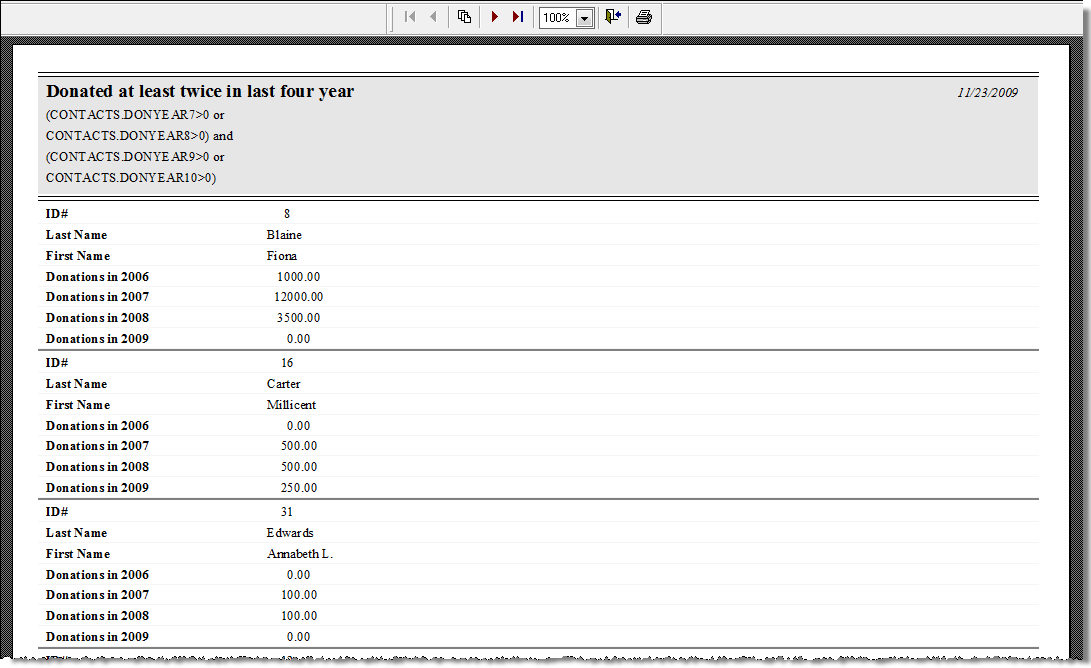
For reports with more fields (where even a Landscape orientation does not accommodate them), choose Report in Form Layout. With this style of report, fields for each record are listed each below the other, with the field names on the left side of the report.
Example Report in form layout
To have PastPerfect choose the report layout for you, based on the number of output fields you have selected, choose Auto Select.
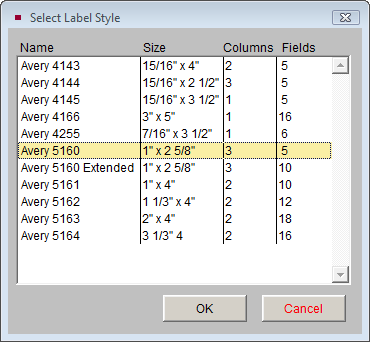
If you want to print address, barcode, or catalog card labels from your report results, you may use the Labels option. You will need to select the label style you want to use; do this by clicking the Select Label Style button.
Next, click on the label you would like to use, based on the size of the label, the number of fields and columns on the label. Click OK to select the style.
Select Label Style screen
Once you have changed your Report Layout type, you must click Rebuild Layout Based on Advanced Layout Settings before you can preview or print your report.
Report Orientation
By default, PastPerfect will be set to Auto Select, which determines whether your report should be in Portrait or Landscape orientation based on the number of output fields you have selected.
If you would like to change your report orientation, select either Portrait or Landscape. Portrait will align the page so that its width is 8.5" and height is 11". Landscape will align the page so that it is 11" wide and 8.5" high.
Once you have changed your Report Orientation, you must click Rebuild Layout Based on Advanced Layout Settings before you can preview or print your report.
Report Subtitle
By default, the Report Title that you entered on the Report Description screen will print on the top of your report and the filter statement used to select records will print below it as the subtitle. You can choose to remove the filter statement as the subtitle to the report by unchecking the box next to Include filter statement as report subtitle. Including the filter statement on the report can help others understand how the report was generated.
When Report is Run
By default, PastPerfect will prompt you with the number of records selected for the report before you preview or print the report. If you want to turn this message off, uncheck the box next to Display count of records selected for the report.
Preview, Modify, and Reset Layout
These buttons allow you to make and view further modifications to your report layouts:
Modify Report Layout - Opens the Report Designer screen, where you may move fields and change the formatting of the report. Making these report modifications are explained in detail in Chapter 19 - Advanced Report Modifications.
Preview Layout - Displays your report with report modifications without filling in the data fields. This gives you an idea of how the report will look on the page before you preview or print the report.
Reset to Default Layout - Restores the report form to its original state (the form layout with either Portrait or Landscape orientation). All changes are removed. If you modified the report layout and you do not like the changes, use this to start over.
NOTE: When you click Exit after creating your report for the first time, you will be asked if you want to save your report. Click Yes to save the report, or click No to discard the report.