Adding a Contact
Once you have completed setting up your Contacts section, you are ready to start entering patrons, donors, members, volunteers, etc. Return to the Main Menu and click on Contacts.
Printing
The Print button at the top of the Contacts screen contains Preview Screen and Print Screen buttons. These allow you to view and print a report containing fields from the Contacts screen for this individual. These fields include: contact ID#, name, address, email, website, phone and fax numbers, group, spouse, total pledged amount, total donation amount, custom fields, notes, activities, mailing lists, last mailed date, follow up date and type, and last donation date.
The Print button also allows you to print letters, envelopes and mailing labels for the selected contact, as well as send an email. Please see Chapter 22 - Letters, Labels & Email for more information.
Add a New Contact
Let's begin by adding a new contact. Click Add at the top of the Contacts screen. The Add New Contact screen in will appear.
Add New Contact screen
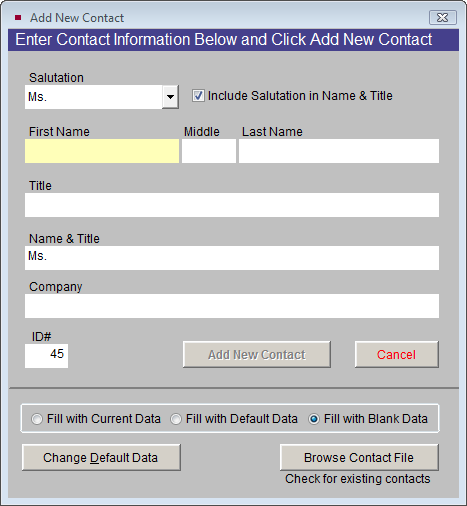
The Add New Contact screen includes the following fields:
Salutation - This field is controlled by a drop-down menu. Click the down arrow next to the field and click on the appropriate title. This authority file can be added to and edited by going to the Main Menu | Setup | Authority Files | Contacts. If you check the box next to Include Salutation in Name & Title, the salutation will automatically be added to the Name & Title field farther down on the screen.
First Name - Enter the first name of the new contact. This name will automatically be added to the Name & Title field, as well as the Dear Casual field.
Middle Name - Enter the middle name or middle initial of the new contact. This name or initial will automatically be added to the Name & Title field. It will not appear as a separate field on the contact record.
Last Name - Enter the last name of the new contact. This name will automatically be added to the Name & Title field, as well as the Dear Formal field along with the Salutation.
Title - Enter the contact's position within a company, military title, or honorable title. This title will automatically be added to the Name & Title field, separated from the name with a comma.
Name & Title - This is the formal title of the contact. It will be printed on mailing labels and letters. If the field does not display the name as you want it to appear on mailings, you may manually change the name here.
Company - If the contact you are adding does not represent a company or organization, you should leave this field blank. However, if the contact is representing a company or organization you may add the company name here. This company name will appear on your mailing labels and letters printed from PastPerfect.
If you do not have a primary contact for a company or organization, but still wish to have a contact record for the company in your database, you may leave the First Name, Middle Initial, and Last Name fields blank, and only enter in the name of the Company in the Company field. However, it is recommended to include a primary contact and the company's name on the contact record if possible.
ID# - Each contact must have a unique ID#. PastPerfect will automatically assign the next available number in this field. You may change the number if needed, but you will be prompted to enter a different number if the number you entered is already assigned to a contact. The ID# may be up to 6 digits. It cannot include punctuation or letters.
Default Data
PastPerfect allows you to create Default Data to simplify data entry. This is especially helpful if you have many contacts with similar information. Default Data fields include: other number, group, primary and secondary addresses, phone numbers, fax numbers, website, and lists.
Contacts Default Data screen
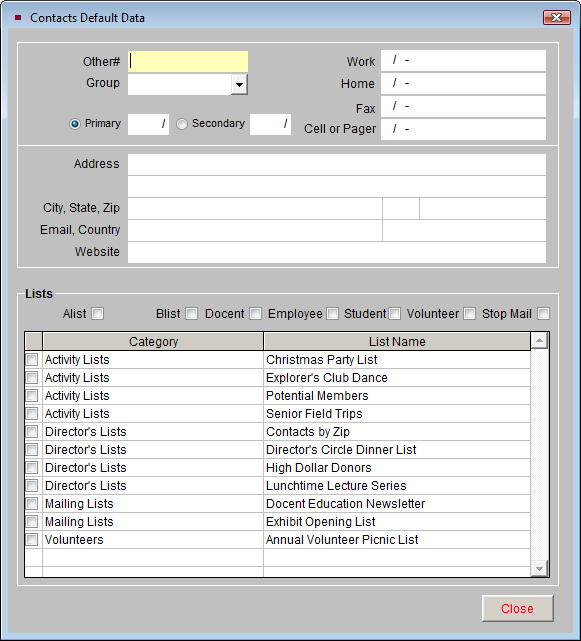
To add or alter default data, click Change Default Data in the Add New Contact screen. Click in the field you want to add to or change and type your text. To add contacts to one of the mailing lists, check the box next to the list name. Click Close to save your changes.
Once default data has been created, you can apply it when adding any contact by selecting the Fill With Default Data option.
Fill with Current Data
Another option to help speed data entry is to use Fill with Current Data. By selecting this option, the new contact record that you add will be filled in with the same data as appears on the contact record showing behind the Add New Contact screen. This can be particularly helpful if you are adding family members with the same address and phone numbers.
Browse Contact File
This feature is helpful when you are not sure if a contact has already been entered into PastPerfect. Simply click the Browse Contact File button and scroll through the list of contacts. You may change the browse sort order by clicking on the column heading. This will sort the list alphabetically according to the column that you select. If the contact is listed, you do not need to add them again.
Once the fields are completed, click the Add New Contact button to create the new contact record.
Fields at the Top of the Contact Screen
Top portion of the Contacts screen

The First Name, Last Name, and Title fields are filled in with the data you entered on the Add New Contact screen. The Dear Formal field is filled in with the Salutation plus the Last Name, and the Dear Casual field is filled in with the First Name. These Dear fields are used when printing mail merge letters. If the names in any of these fields are not as you would like them, you may edit them.
Group - Groups may be used to define the relationship between your organization and the contact. A contact can only be in one group at a time, so your groups should be mutually exclusive. Chose a group from the drop-down menu. You do not need to assign every contact to a group. Groups are defined by going to the Main Menu | Setup | Contacts | General Information.
Spouse/Spouse ID# - You may want to create a separate record for each individual in a couple, then link them by typing the spouse's Contact ID# in the Spouse ID# field. If a record has already been created for the spouse, you can select it from the list of Contacts by clicking the file folder icon. Once a link has been established, you can click the file folder icon to view the spouse's record.
Other # - If you have another numbering system you currently use, or a numbering system from a previous software, enter the contact's number here.
Image Management - Use this feature to display a picture of the contact. If your PastPerfect system is equipped with the optional MultiMedia Upgrade you may attach and display an image through Image Management.