Viewing a List
From the List Manager screen, you can select a User Defined List or Fixed List and view its contacts in a variety of formats. To view a list, click once on the list, then use the View Selected List button in the View section of the Sidebar. You can also double click on the list to advance to the View Contact List screen. You must have records on the list before you can view it.
TIP: You may change the sort order for the list by clicking on the column header of the field by which you want the list sorted.
View Contact List screen

The List Actions section of the Sidebar has options for viewing the contacts on the list, printing mailings for the contacts, mapping the contacts on the list, performing a global change for all records on the list, as well as temporarily narrowing down the records on the list.
Narrowing a List
Once you have a list created, you may want to perform actions for a subset of people on that list. For example, you want to send an email to your active members who are paid through a certain date range, or you want to send a letter to contacts on a user defined list that have a specific zip code. You can use the Narrow List function to target a subset of people on an existing list. The Narrow List function temporarily narrows your list to the selected subset so you can perform your desired action, then it returns to the full list the next time you view it.
Click the Narrow List button to bring up the Narrow Contact List screen. This screen will be filled in with the widest range of information for the people on the list. For example, if the last name that comes first alphabetically is "Baker" then that will show up in the From field next to Lastname. If the last name that comes last alphabetically is "Underwood" then that will show up in the Thru field next to Lastname.
Narrow Contact List screen
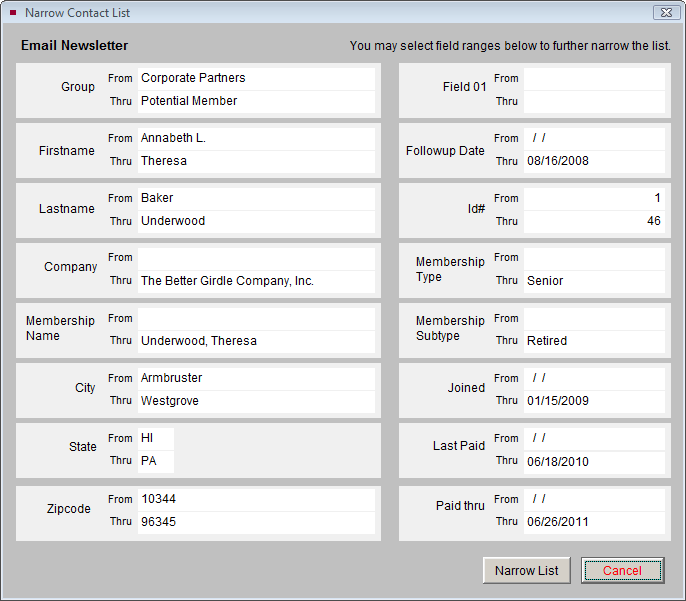
If you would like to narrow your list to members who are set to expire in a certain time range, enter that range in the date fields next to Paid Thru. If you want to narrow your list to contacts in a certain zip code, enter the zip code in both the From and Thru fields next to Zipcode. Then click Narrow List. You will return to the View Contact List screen and your list will show just the contacts who match your ranges. The screen below displays 7 of the 31 contacts who have the zip code of "19341." If you want to reset the list to show all contacts, click Reset Narrowed List under List Actions. You may narrow the list again using different parameters. If you do not click Reset Narrowed List and you exit from the View Contact List screen, the list will automatically reset.
View Contact List screen displaying narrowed list

View Records
To browse through the contacts' full screens, click the View Records button. You can edit, spell check, print individual letters, post donation or dues payments, and perform other functions while viewing the selected records.
Printing and Exporting Lists
The Print, Export and Email button allows you to print the contact list, export the list to Excel, or print letters, labels and envelopes for people on the list. You may also send a mass email to everyone on the list with an email address. Lists will be sorted in the order you selected by clicking a column header on the View Contact Lists screen. When you click the Print, Export and Email button, the next screen will give you options.
If you are printing a list and you would like it to include Membership information such as membership type, last paid date and paid thru date, check the box next to Include Membership Information. You may choose to include contacts with Stop Mail by placing a check in the box next to Include Contacts Marked Stop Mail. To include Life Members, place a check in the box next to Include Life Members. If you use primary and secondary addresses, to ensure you have the correct addresses, make sure the date in the Mailing Date field is the date you are sending the mailing.
Once you have made your selections, to preview the selected list (with or without Membership Information), click the Preview List button. If you select the "Print List" radio button and click the Print button, this list will be printed.
Print/Export Options screen
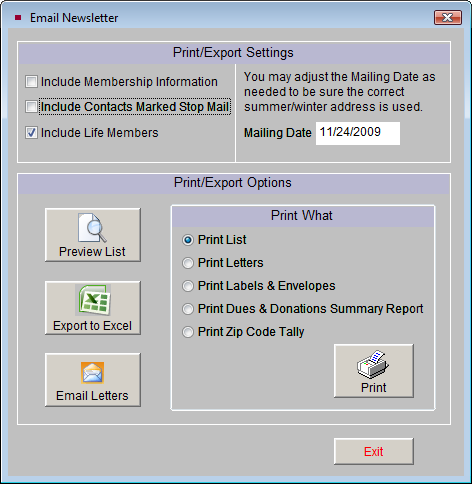
You may export the list to an Excel file by clicking the Export to Excel button. The file will open in HTML using your computer's MS-Excel. The file is saved in HTML (.htm) format and stored in the PP5Reports folder on your Local Disk drive (usually C:/). If you wish to save it as an XLS file, go to Save As in the Excel File menu and choose "Microsoft Office Excel Workbook" as the file type.
You have the option to print a Dues & Donations Summary Report for all contacts on the list. This report will list the total dues and donations given by each contact for a range of 10 years.
You may also print a Zip Code Tally, which will count the number of contacts within each 5-digit zip code, or with the same first three numbers of their 5-digit zip code. The 3-digit code tally can also be used to tally Canadian and UK postal codes.
From this screen you may also print letters, labels and envelopes and send emails. Following through with our "Example A" from earlier, you would use the Email Letters function to send a mass email to all the contacts on your list. Please see Chapter 22 - Letters, Labels & Email for more information about printing mail merge letters, as well as sending email to contacts.
TIP: In Main Menu | Setup | Workstation Settings, you can enable multiple output options when printing any PastPerfect report. Check the Output Reports to PDF, Word, HTML, etc. box to have this option. You will still be able to print to an ink jet or laser printer as usual.
Map Contact List
The Map Contact List button enables you to create map data files which may be imported into mapping programs such as Microsoft Streets & Trips, Microsoft MapPoint and Google Earth Pro. You can create a map point for each contact on the list, then launch your mapping program, import the data, and display a map.
NOTE: You will need to install the Microsoft or Google mapping software and enter the path and file name to launch the mapping program. Please go to Main Menu | Setup | Mapping to enter the path and file name of your installed mapping program.
Let's look at an example of how to use the Map Contact List action. From our "Example B" earlier in the chapter, once the list of paid-up billing members who have not donated in the last two years has been created, you may review the list. You can use the View Lists tools to print a report with each person's contact information and export the list to MS-Excel for distribution to your solicitors. To get a sense of where these contacts are located, you can use the Map Contact List function to pinpoint all the contacts on a map. You can see if you need to target contacts in certain geographic areas. You can even print the map so that your organization's solicitors can reach out to the potential donors in their areas.
Global Change
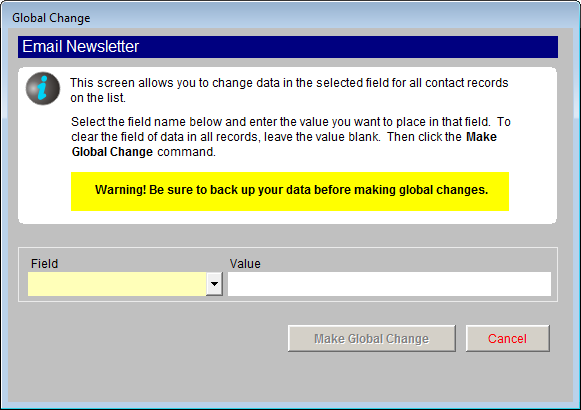
The Global Change function is the most powerful tool in Contacts Lists. This option enables you to make changes to all of the records on the list at once. Please use caution when performing this action. It is strongly suggested that you make a Hard Drive Backup before you begin.
To make a global change, on the screen seen below, first use the Field drop-down menu and select the field to be changed. Next, enter the exact value you want to enter in that field for all records. If an authority file is available for the field, you may right click or press F7 to view the authority file and choose your term from the list. Once you are sure the value is exactly as you want it, click Make Global Change.
Global Change screen
Update Summer and Winter Addresses
The Contacts List Manager screen has two other options, Update Summer and Winter Addresses and View Mailing Log. If you use both primary and secondary addresses for your contacts as summer and winter addresses, you can make sure the program will use the appropriate address based on the date you are doing your mailing by clicking the Update Summer and Winter Addresses button. It will make sure the correct address is being used for a mailing being sent today, based on the dates entered next to the Secondary field on the contact records.
View Mailing Log
To view a list of mailings sent from PastPerfect, click the View Mailing Log button. The screen below will appear. The Mailing Log is updated when a letter or mailing label is printed, an email is sent, or a list is exported to Excel, and you select Yes at the Add Entry to Mail & Contact Log screen.
TIP: To make sure your mailings are included in the Mail & Contact Log, be sure to click Yes on the Add Entry to Mail & Contact Log screen which appears after you print a letter, label, envelope, send an email, or export a list of contacts to Excel.
Mail & Contact Log screen
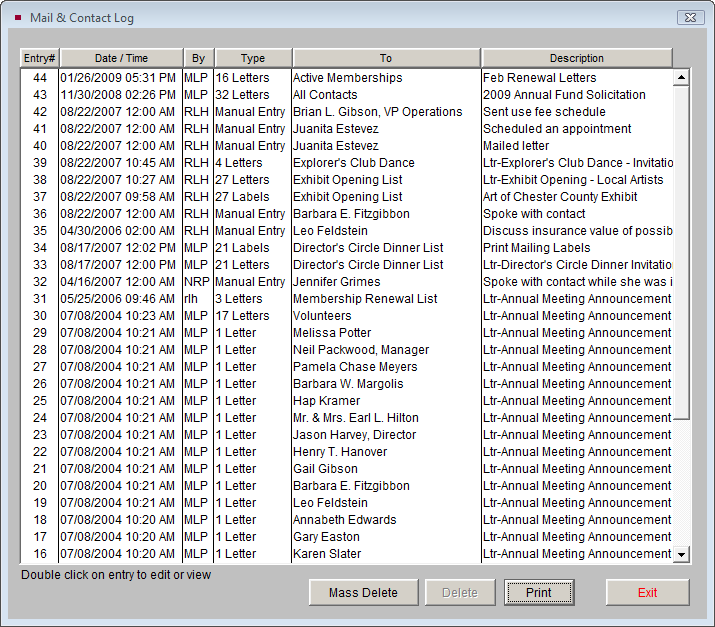
To view or edit the details of an entry, double click on the entry. You may also delete entries according to date, with the Mass Delete button or delete them one at a time.
To mass delete entries:
- Click the Mass Delete button. Enter a date in the Delete all Mail & Contact Log entries older than field.
- Click OK.
- Click Yes.
To delete an individual entry, highlight the entry by clicking on it. Then click Delete and click Yes. You may also print the entire log by clicking the Print button at the bottom of the screen. Click Exit to return to the Contact Lists Manager screen.