The Objects Catalog
Once you have completed the accession process, it is time to begin cataloging. Many items accepted into museum collections fall into the object or artifact category. Each object must have its own unique record that contains information about that object and that object alone.
Cataloging is the science of museum work. This is especially true of museums using computerized cataloging systems. The data that you develop about each object - its ID number, name, description, dimensions, creator, and so on - will help distinguish that object from every other object in the collection.
Cataloging is a time consuming task. It requires patience and attention to detail. It is sometimes tempting to "lot-catalog" similar objects with one catalog record. However, this should be avoided. If an object deserves a space in your museum, even if it is very similar to other objects, then it deserves its own catalog record. When you run reports or perform searches, you will be happy to have put in the time to create a detailed and accurate catalog record for each object.
Navigating the Objects Screen
The PastPerfect Objects catalog is used for describing art, archaeology, natural history, geology, and history objects. Each type of object requires a specific set of fields to create an optimal catalog record. In the fixed area near the top of the Objects screen, you will find common fields for cataloging all objects. These basic fields are Collection, Object ID, Object Name, Other#, Old#, Accession#, Source, Home Location, Date, Year Range, Catalog Date, Cataloged by, Status Date, Status by and Status. These fields are not only common to all Object records, but also to all Archives, Photos and Library records. The Objects catalog also includes the Other Name field below the Object Name field. MultiMedia Upgrade users will see the Image Management button and a thumbnail from an attached digital image located to the right of the common fields.
To begin cataloging, click on the Objects button from the Collections section on the Main Menu. If you have no records in the Objects catalog, the Objects screen will be blank. If you have records in the Objects catalog, the last viewed record will appear on the screen.
At the top of the screen you will see a Navigation Bar. Its buttons help you navigate through the Objects catalog as well as add, edit, find, spell check, and print records. The buttons are in the following order from left to right: Move to Beginning of File, Prior, Next, Move to End of File, Add, Browse, Edit, Spell, Find, Query, Delete, Print, Media (for MultiMedia Upgrade users) and Exit. For more information about using these buttons, please see Chapter 2 - The Basics. The Query function is explained in more detail in Chapter 14 - Research.
The Media button is available to PastPerfect users who purchased the MultiMedia Upgrade. This option enables you to link audio files, video clips, archival images, spreadsheets, PDFs, MS-Word documents, Web pages and other files to records. You can link any file your computer is able to open and run.
To the right of the Navigation Bar, you will see a field that enables you to choose how to sort records in the Objects catalog. To select a Sort by field, use the drop-down menu and click on one of the indexed fields. These fields include Accession#, Artist, Collection, Home Location, Object ID, Object Name, Site Name, Source, Title, Updated, and others.
TIP: Depending on your accession numbers and Object ID numbers, you may want to go to the Main Menu | Setup | System Parameters and change your Object ID# Sort by options. You may choose Numeric sorting rather than Alpha sorting, then enter the separator (common separators are "." and "-"). This ensures that your records sorted by Object ID or Accession# are sorted numerically (2001.1.1, 2001.1.2, 2001.1.3, 2001.1.10, etc.) without needing leading zeros.
To the right of the Sort by field is the To Do List. To open the To Do List, click the icon.
This feature allows you to flag records, creating reminders for needed actions. You can specify the flag type and enter a detailed reason. You can then print a list of all flagged records, or flagged records from one of the catalogs. If a record is flagged, the check will turn red.
The Sidebar on the left provides views of screens that contain sets of specific fields for cataloging different types of objects. The Screen View section enables you to see fields particular to that object type. Other Views give you access to detailed fields that capture appraisal, condition, size, classification, location, source, and other information. To view these subscreens, hold your mouse over or click on the button. In order to edit the screen's fields, you will need to left click on the button for the view you want to see and click Edit in the Navigation Bar.
Objects Sidebar
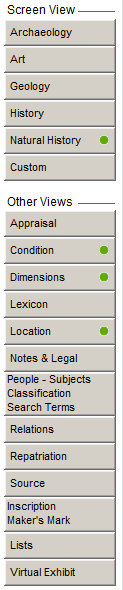
NOTE: Green Data Lights appear on buttons when more information is available when clicking that button.
In the middle of the Objects screen, you will see radio buttons just under the common fields at the top of the screen. These buttons allow you to select the object type (Archaeology, Art, Geology, History, Natural History or Custom) and set your default screen view for the catalog record. Whenever you open that particular record, the selected screen view appears. The default screen view can be changed by clicking the Edit button, clicking the radio button next to the desired view, and clicking Save.
When the Art Screen View is selected as the default view, fields such as Title, Artist, Signed Name, Medium, Technique, Frame Description, and Provenance are displayed. The Art and History Screen Views share some fields, but unique fields to History include Place of Origin, Event, Found, Made, Used, and Owned. The Archaeology Screen View contains fields helpful in documenting archaeological collections, including Collector, Excavated by, Identified by, Site, Site#, Feature, Dating Method, etc. The Geology Screen View has fields to describe Rock Type, Chemical Composition, Crystal System, Specific Gravity, Hardness, Luster, Streak, Fracture, Origin, Grain Size, Color, etc. The Natural History Screen View provides fields for taxonomic classification and other fields relevant to biological, paleontological, or botanical specimens. You will probably never use all fields for all objects. However, you may use fields located on other screen views. The button for any screen view with populated fields will have a green data light. Unpopulated screen view buttons will not have a green data light. You should use all the fields that are appropriate for the object you are cataloging.
Each catalog, including Objects, has twenty-two custom fields located in the Custom Screen View. They are character, numeric, date and memo fields. Many of the character and memo fields have authority files, which may be shared with the three other catalogs. For more information about setting up authority files, please see Chapter 3 - Getting Started.
To learn more about fields in the Objects catalog, please go to the Main Menu | Reports | Objects | Objects Field Descriptions, run the report and either preview or print the report. This report contains a description of each field in paragraph format, then the field name, field type and number of characters in brackets. Another way to view the field descriptions while working in the catalog screen is to use the F1 key on your keyboard to display the description. Click in the field in question, then press the F1 key to display the definition of the field.
NOTE: Object ID#s may be any combination of characters or numbers up to 25 characters in length. If you do not already have a numbering scheme, we recommend that you use a three part number system as suggested by Daniel Reibel in his book Registration Methods for the Small Museum. For example, in the catalog number 2008.21.1, "2008" represents the year the accession was made, "21" represents the 21st accession made that year, and "1" represents the first object in that particular accession.