Getting Started
From the PastPerfect Main Menu Collections section, click on the Archives button to open the Archives catalog.
If the catalog already contains data, the catalog record that was last viewed will display. If this is the first item entered, the screen will display blank data fields. Click the Add button in the top Navigation Bar to begin.
Add New Catalog Record screen

Enter an Accession#, Object ID and Object Name into the Add New Catalog Record screen fields, then click Add New Record. In Add Mode, you will be able to add information about the item. Once you complete data entry for the fields common to all catalogs at the top of the Archives screen, you will start entering information in screen views with fields tailored for archival materials. For more information about the Add New Catalog Record screen please see the section for "Adding a Catalog Record" in Chapter 6 - The Objects Catalog. For more information about the common fields at the top of the screen, please see the section for "Fixed Fields at the Top of the Screen" in Chapter 6 - The Objects Catalog.
The Archives Screen Examined
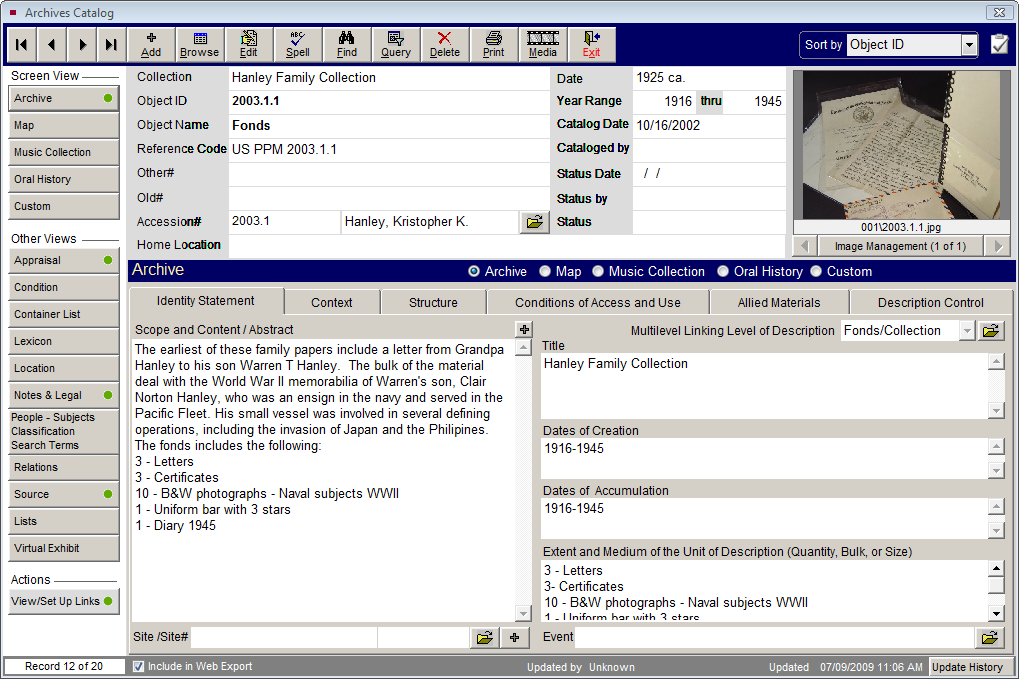
The top of the Archives catalog screen is essentially the same as the top portion of other catalogs we have discussed. It contains the Collection name, Object ID, Object Name, Other#, Old#, Accession#, Source, Home Location, dates, cataloger, status information and Image Management (for MultiMedia Upgrade users).
NOTE: If the Archive record was added without an accession number, you may link to an existing Accession record, or create the Accession record from the Archive record. Click the file folder icon to the right of the Accession# field. You will be asked if you want to link to an existing Accession record, or create a new Accession record. The next screen will allow you to find the existing Accession records or create a new record.
Unlike the other catalogs, Archives has a Reference Code field. The Reference Code is used to provide a unique identifier for the archival record and a link to the description that represents it. The reference code is made up of three parts; a country code, a repository code, and a specific local object id number. For example: US MnHi P2141. This reference code indicates that the item, P2141, is located at the Minnesota Historical Society in the United States.
Just below the Home Location field, you will notice the screen view name on the left and five radio buttons on the right. These buttons represent the different screen views available for this catalog: Archive, Map, Music Collection, Oral History, and Custom fields. You may set a default screen view for each catalog record so that whenever you open that particular record, the selected screen view appears. Please note that you need to be in Add Mode or Edit Mode to select the default screen view.
Each type of archive record has a particular set of fields that are needed to catalog that type of item. These fields are grouped in Screen Views. At the top of the left Sidebar, you will see buttons for each screen view. Although you will probably not use all fields for all archival records, you may find fields in multiple screen views useful for describing items. While you can set the default screen view for this record using the radio buttons, you can access any field in any view from the Sidebar. To view fields, click the desired screen view button. To edit fields, please click on the screen view button and then click Edit in the Navigation Bar at the top of the screen. Screen views with completed fields will have a green data light.
Archives Catalog screen
In the Sidebar below the Screen View section, you will see Other Views. These buttons open additional information screens which are common to all four catalogs and are explained in depth in Chapter 6 - The Objects Catalog. The exception is Container List, which is unique to Archives. At the bottom of the Sidebar in the Actions section is the button for View/Set Up Links. This screen enables you to create, change and view links between archival records at different levels of description. This chapter includes more information on entering a container list and performing multilevel linking.
In the Archive view, you will find six tabs that contain ISAD(G) archival fields. The tabs are: Identity Statement, Context, Structure, Conditions of Access and Use, Allied Materials, and Description Control. This chapter will discuss how to enter data for each field in these tabs.
We will also describe how to enter data in the Map, Music Collection, Oral History, and Custom screens.