Library Cataloging Tutorial
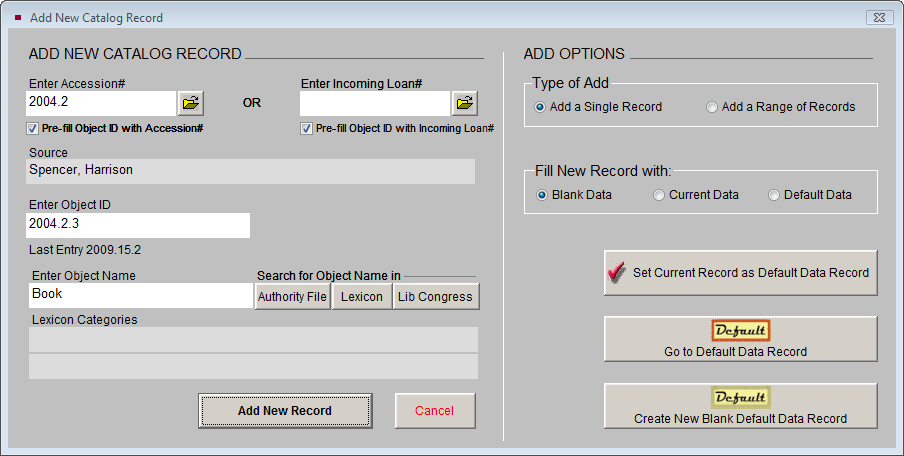
Now that you are aware of the options for cataloging library items, let's walk through the steps in the following example. For this example, let's catalog a book with the Object ID 2004.2.3. First, open the PastPerfect program and click on the Library button on the Main Menu. On the Library catalog screen, click the Add button at the top of the screen. The Add New Catalog Record screen will appear. For this tutorial, be sure you have Add a Single Record and Blank Data selected in the Add Options section.
- Enter the Accession#: 2004.2
- Enter the new Object ID: 2004.2.3
- Enter the Object Name: Book
- Click the Add New Record button.
- Click on the Subcategory "Documentary Artifact".
Add New Catalog Record example
Enter the appropriate information in the top section of the Library catalog screen. This upper portion is essentially the same for all four catalogs. These fields include the collection name, identification numbers, source information, date information, status information, home location, and the Image Management section. Please see Chapter 6 - The Objects Catalog for more detailed information about these fields. In the Library catalog, the field for Call# also appears at the top of the screen.
Upper portion of the Library Catalog screen
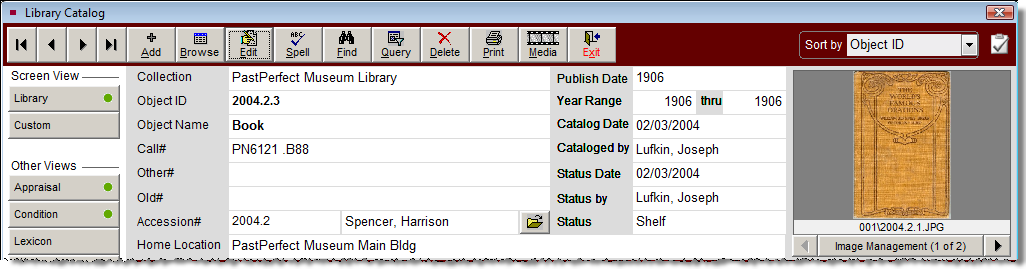
Image Management - If your PastPerfect system is equipped with the optional MultiMedia Upgrade, clicking the Image Management button opens the Image Management screen, where you may add images to your Library record. Additionally, multimedia files may be attached to your record by clicking the Media button at the top of the screen. Your Media, Browse, Edit, Print, etc. buttons in the Navigation Bar are available after you save your record. See Chapter 26 - Multimedia for information.
Library Screen View
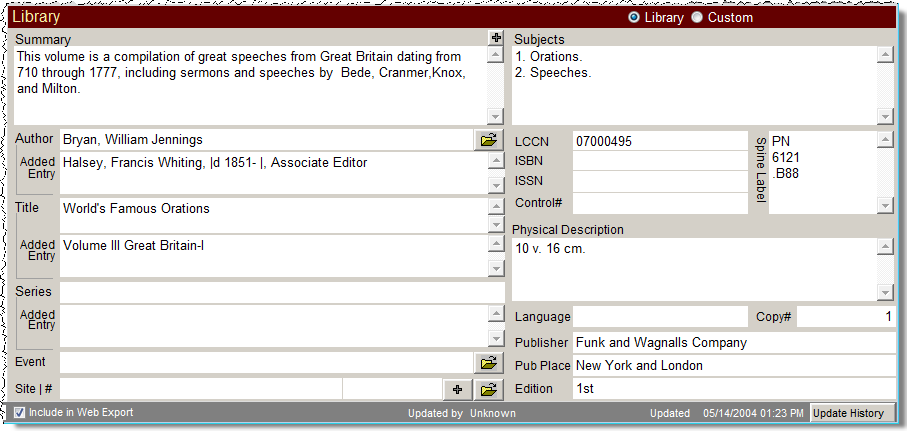
Next we will enter data in the lower portion of the screen. The Library catalog field descriptions may be viewed or printed from the Reports menu. This report is accessed from the Main Menu | Reports | Library | Library Field Descriptions. You may also use the F1 key on your keyboard. Click in the field in question, then press the F1 key to display the definition of the field.
Library fields here are specific to published documents, including: Summary, Authors, Titles, Series, Edition, Subjects, LCCN, ISBN, ISSN, Control#, Spine Label, Physical Description, Language, Copy#, Publisher, and Publication Place.
Lower Portion of the Library Catalog screen
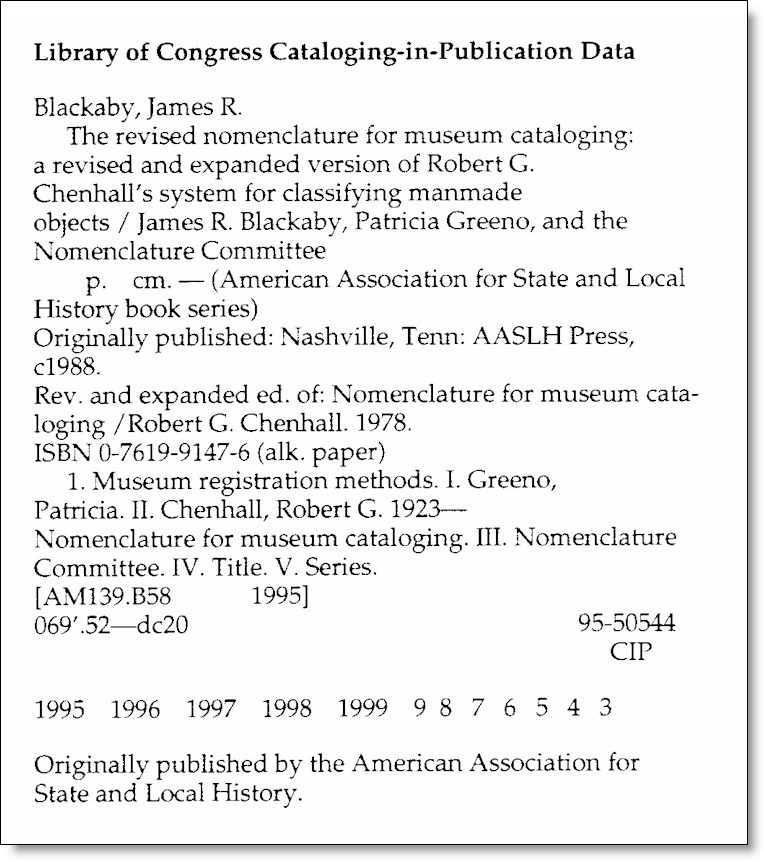
Library cataloging requires a specialized set of fields, some of which may be unfamiliar. In new books, much of the cataloging information you need will be on the verso, or reverse side, of the title page of the book. This cataloging information is called CIP (Cataloging in Publication). CIP provides the author, title, series name, publication date and place, publisher, call number (both Library of Congress and Dewey Decimal System), LCCN, ISBN, and subject entries.
In the case of older books that do not provide CIP, you can get the information from an online library and copy it into your PastPerfect record.
Cataloging in Publication
Control# - The Control Number is a number commonly assigned to MARC records by vendors who provide MARC records to libraries.
ISBN - International Standard Book Number is a unique 10-digit number assigned to each book to facilitate identification. Even though the content may be identical, a different ISBN number is assigned to the hardcover and paperback versions of a book.
ISSN - International Standard Serial Number. A unique number that identifies the publisher and serial number of a journal, periodical, magazine or newspaper.
LCCN - Library of Congress Control Number.
Physical Description - The Physical Description field is used in library cataloging to help identify a book by how many pages it has and how it looks. The physical description is provided in the CIP.
Summary - In the Library catalog, the Summary field is equivalent to the Description field in the other catalogs. The summary should include the title of the work and a condensed presentation of the substance of the book introducing its main points.
Subjects - The Subjects field is used to locate library materials for which an exact author or title is not known. For new books, you will find the CIP information on the verso of the title page which includes the subject headings. For older materials, you may need to generate original subject headings or obtain the information from existing cataloging from an online library service. You may also consult the Anglo-American Cataloguing Rules (AACR2) for subject information. The Subjects field may be used when printing catalog cards.
Subjects Field
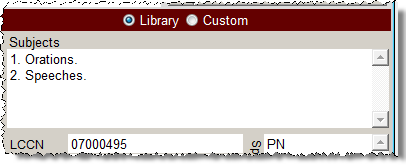
Sorting Subject entries - If entries in the Subjects field are separated by a carriage return, you may press the A/Z sort button to arrange the entries alphabetically. You must be in Edit Mode to sort the entries.
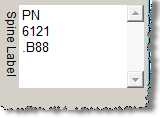
Spine Label - Enter the Call# as you would like it to appear on the printed spine label. Spine labels may be printed using the Navigation Bar Print button at the top of the Library catalog screen or from the Reports screen under the Library section.
Spine Label Field
Custom Screen View
Clicking the button below the Library button under Screen View on the Sidebar will display the custom fields for the Library catalog. This screen provides twenty-two custom user-defined fields. You may assign your own screen view name and field names to these fields. For more information on the custom fields, please see Chapter 6 - The Objects Catalog. A green data light will appear on the Custom button when there is data in this view. Please note if you rename the screen view, the button will display the new name instead of "Custom." You may set this Custom screen view as the default (rather than Library) by clicking the radio button next to Custom (or the new name), which appears above the Subjects field.
Other Views
In the Sidebar of the Library catalog screen, under Other Views, you will notice the following buttons.
- Appraisal
- Condition
- Lexicon
- Location
- Notes & Legal
- People-Subjects-Classification-Search Terms
- Relations
- Source
- Lists
- Virtual Exhibit
These buttons provide access to additional data screens. These screens are common to all catalogs and are described in detail in Chapter 6 - The Objects Catalog and Chapter 7 - The Photos Catalog. To view these screens, move your mouse over the button. To hold that view on your screen, click on the button.
When any of the fields contained in the Screen Views and Other Views are populated with data, the green data light appears. This lets you know that there is more information available in that view.
NOTE: If the Library record was added without an accession number, you may link to an existing Accession record, or create the Accession record from the Library record. Click the file folder icon to the right of the Accession# field. You will be asked if you want to link to an existing Accession record, or create a new Accession record. The next screen will allow you to search the existing Accession records or create a new record.
Actions
Library of Congress Online Catalog Website - This button will open up the Library of Congress Online Catalog in your Web browser, as long as you have an active internet connection. You may search for books online, then copy and paste the text from the website into your records.
Buttons in Edit Mode
Clicking the Edit button at the top of the screen will reveal options for making changes to the record.
Change Access#, Object ID or Loan# - Allows you to edit the Accession number, Incoming Loan number, and Object ID for this record. Use this to correct records where the numbers were entered incorrectly.
Deaccession - This button enables you to transfer the record from the Library catalog to the Deaccession catalog. For more information about deaccessioning items, please see Chapter 5 - The Accession Process.
Change Catalog - Allows you to move the Library record to one of the different catalogs - Objects, Photos, or Archives. From this screen you may select the correct catalog for the item and click OK. This will move the catalog record to the other catalog and mark the record in the Library catalog for deletion. Note the large yellow warning box near the top of the catalog screen. The record in the original catalog will be sent to the Recycle Bin and no longer displayed. Because each catalog contains different fields, not all data may be transferred to the new catalog. We suggest printing a copy of your record before using the Change Catalog function.