Letter/Email Template Modifications
PastPerfect uses document templates for forms, letters, and receipts that are used frequently. These templates allow you to create the layout and basic text for a document, and you can insert field place holders that will populate automatically when you go to print from a specific record.
Please note: When you edit templates, changes will only be reflected when new documents are created. Record-specific documents composed before changing the template will remain the same. However, you can update those individual documents with the latest template using the "Rebuild" button on each specific letter/receipt.
Tips for working with templates:
•When you click into the body of the template, it expands to display the whole template.
•You must be in Edit mode to modify a template.
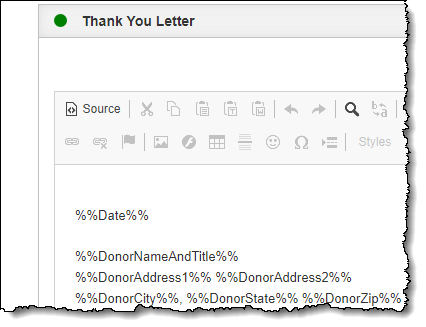
•Green data lights indicate there is information within that template.
•Red data lights indicate there is unsaved information within that template. Be sure to save your information before going to another screen.
Place Holder Fields
You can insert place holder fields within your document templates that will merge in data from a specific record. Different templates will have access to different sets of fields.
1.While in Edit mode, select the field you wish to insert from the drop-down Place Holder Field list
2.Position your cursor in the template where you want the place holder field to be inserted
3.Click the "Insert" button
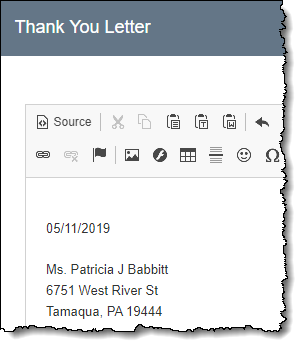
The place holder field will appear in the document with double percent signs around it (e.g. %%Date%%). When the document is printed for a specific record, the whole place holder will be replaced.
Insert New Image
You can insert an online image (like a logo or a scanned signature) into your document templates by using the Image button in the Toolbar. If you have not used a particular image in a Web Edition document, you must upload the image first.
1.Position your cursor in the template where you want the image to be inserted
2.Click the Image button in the toolbar
3.Click the "Upload" tab
4.Click "Choose File"
5.Navigate to and select your local image file, then click "Open"
6.Click "Send it to the Server." When the image is uploaded, it will switch to the Image Info tab and the URL will be populated.
7.Populate other fields if you desire
8.Click "OK"
Insert Existing Image
If you have already uploaded an image to use in your Web Edition document templates, you can insert the image into another document template using the Image button in the Toolbar.
1.Position your cursor in the template where you want the image to be inserted
2.Click the Image button in the toolbar
3.Click the "Browse Server" button
4.Select the image you want to insert
5.Populate other fields if you desire
6.Click "OK"
Links
If you want to share hyperlinks (to web pages or email addresses) within your document, you can do so using the Link button in the Toolbar. This can be useful if you are emailing your document.
1.Highlight the text you want to be the link within the body of your letter. This could be a full URL, an email, or a word/phrase like "click here".
2.Click the Link button in the toolbar 
3.Select the Link Type (URL or Email)
4.Fill in the appropriate fields
5.Click "OK"
Toolbar Buttons
Many of the buttons in the toolbars for the templates are common word processing tools. Hovering over each tool button will reveal the title for each tool. Here is a partial list of the ones used most often.
|
|
Bold / Italic / Underline |
|
|
Font Name |
|
|
Font Size |
|
|
Text Alignment (Left, Center, Right, Justified) |
|
|
Insert (Remove) Numbered / Bulleted List |
|
|
Decrease / Increase Indent |
|
|
Text Color |
|
|
Background Color |
|
|
Insert Image |
|
|
Create / Remove Link |
|
|
Cut / Copy / Paste |
|
|
Paste as plain text |
|
|
Paste from Word |
|
|
Undo / Redo |
|
|
Find / Replace |
|
|
Select All |
|
|
Spell Check |
|
|
Strikethrough |
|
|
Subscript / Superscript |
|
|
Remove Formatting |
|
|
Insert Special Character |
|
|
Insert Horizontal Line |
|
|
Insert Page Break for Printing |
|
|
Insert Table |
|
|
Insert a Smiley |