Contacts Setup
It is recommended that you set up your Contacts database parameters before beginning to enter data in the Contacts screen. This is where you will define your membership types and subtypes; compose mail merge and email letters; create donation funds and thank you letters; set up default pledge thank you and reminder letters; and define volunteer projects.
To access the Setup Contacts screen click Setup on the Main Menu, then click Contacts on the drop-down menu.
There are nine buttons on the left side of the screen: General Information, Donation Funds & Thank You Letters, Mail Merge Letters, Membership Types, Membership Subtypes, Campaigns & Pledges, In-kind Gifts, Volunteer Projects, and Email. Each section is used to define or create data that you will use throughout Contacts and Campaign Management.
Setup Contacts General Information screen
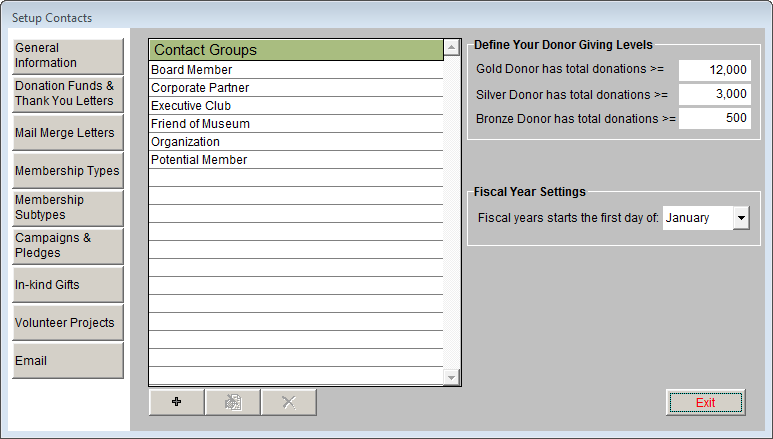
General Information
Contact Groups - Contact groups may be used to define the relationship between your organization and the contact. A contact can only be in one group at a time, so your groups should be mutually exclusive. On this screen you may create or delete contact groups, which are then available in the Group drop-down menu on the Contacts screen.
To add a contact group, click the plus sign button, then type a group name in the New Entry field. Click Add to add it to the list. To edit an existing contact group, click on the group to select it. Then click the edit button. On the Modify Entry screen, change the name and click Save to make the change. To delete an existing contact group, click a group name to select it. Click on the red X button, then click Yes. This group will no longer show up on any Contact records and it will not be listed in the Group drop-down menu.
Define Your Donor Giving Levels - PastPerfect will automatically place your contacts in a donor group, Gold, Silver, or Bronze, based on the total amount of donations to your institution. You may change the total donation amounts by typing the number in the box next to each giving level.
Fiscal Year Settings - You may select the month when your fiscal year begins. For example, use January if your fiscal year runs January 1 through December 31; use July if your fiscal year runs July 1 through June 30. This setting affects how your Pledges & Receipts screen displays pledges, donations, and dues payments, how the reports print from the Pledges & Receipts screen, and how the Giving Summaries appear on the Contact screen.
Donation Funds & Thank You Letters
When Contacts donate monetary gifts to your institution, each gift is made toward a specific fund. The Donation Funds & Thank You Letters screen allows you to create the names of various funds used in entering donations. The donation funds created here will then be available in the Fund drop-down menus when entering a donation or pledge.
This is also where you set up the default letter for Donation Fund Thank You Letters and compose Donation Fund Thank You Letters.
Contacts Donation Funds & Thank You Letters screen

Default Donation Fund Letter - For each fund added to PastPerfect, you can compose a thank you letter to mail to donors who contribute to that fund. However, before funds are created, it is recommended that you create a default donation fund letter. This default letter will be used as a template for creating each new fund's thank you letter. To compose this default letter, click on the Setup Default Donation Fund Letter button and compose the letter in MS-Word. For more information about using MS-Word in PastPerfect, see Chapter 22 - Letters, Labels & Email. Once you have a default letter and fund names added to your list, select a fund and click Compose Selected Fund Letter. Your default letter will appear and can then be modified to better suit the selected fund.
TIP: Before creating your first fund, set up the Default Letters first to include the text and graphics that you want on all letters, like your letterhead, mail merge name and address fields, and your signature lines. The Default Letters help to save you time, so you don't have to add these things with each new letter that you create.
Donation Funds - To create a new fund, click the plus sign button. Type the name of your fund in the New Entry field of the Add New Entry screen. You may also enter a Code number. Fund codes are optional and can be used to group multiple funds for accounting purposes. Then click Add to add the new fund to the list of Donation Funds.
Each donation that you enter in PastPerfect must be assigned to a fund. You may add funds as often as needed.
To edit a fund name, select the fund and click the edit button. On the Modify Entry screen, change the name and click Save to make the change. Please note that if you need to edit a fund name for a fund to which donations have been posted, you will need to go to each donation and pick the new name from the drop-down menu. Otherwise the fund name will not show up on the Donation Details screen, and you will not be able to run reports by the old fund name.
We do not suggest deleting a fund once you have posted donations to it, as you will no longer have the ability to run reports by the deleted fund name. If you need to delete a fund, click on the fund name, then click the red X button, then click Yes to delete the fund.
Compose Selected Fund Letter - Once you have set up your default donation fund letter and added a fund, you can compose the thank you letter for donations to that fund. Select the fund, then click Compose Selected Fund Letter. This will open MS-Word, and your default letter settings will appear. Compose the rest of your letter, tailored to thanking contacts for donating to this specific fund. You may insert mail merge fields to fill in information such as the donation fund name, the donation amount, and donation date. Please see Chapter 22 - Letters, Labels & Email for more information about writing the letter. These letters are available to be printed after posting a donation payment on the Donation Detail screen.
Mail Merge Letters
Mail Merge letters are general mailings to your members, potential members, and other contacts. These letters encompass most mailings you may send, except for donation and pledge thank you letters or pledge reminder letters. Mail Merge letters may be printed for an individual contact by clicking the Print button in the Navigation Bar at the top of a contact record. They can also be printed for groups of people from the Contact Lists screen. Use this screen to compose these mail merge letters.
Setup Default Letter - To help save time when adding new mail merge letters, you should first create a default letter by clicking Setup Default Letter. This will open MS-Word, where you can enter your template letter information. When you create a new mail merge letter, it will start with the default letter template.
Compose Selected Letter - To create a new letter, click on the plus sign button. Type the name of the letter in the New Entry field and click Add. The letter name will be added to the list of letters.
Highlight the letter name, then click the Compose Selected Letter button and MS-Word will appear. If you have set up a default letter, you will see that text here. Compose your letter on this screen. Mail merge fields, which will be replaced with information from each contact's record when printed, can be added with the Insert Selected Field command. These fields include membership types, dues amounts, membership expiration dates, donation and dues summary data, pledge and prospect information and biographical information. For more details about composing your Mail Merge letters, please see Chapter 22 - Letters, Labels & Email.
Word screen for a Mail Merge letter

To edit an existing letter name, click on the name in the Letters list to select it. Then click the edit button.
On the Modify Entry screen, change the name and click Save to make the change. To delete an existing letter, click on the letter to select it. Click on the red X button, and then click Yes to confirm the deletion of the letter.
Membership Types and Membership Subtypes
Most museums and collecting organizations have memberships with varying levels of support. The Membership Type and Membership Subtype screens allow you to create the types and subtypes used for your memberships. These options will then be available in the corresponding fields on the Membership Screen View of the Contacts screen. It is recommended that you set up membership types and subtypes before creating memberships on the Contacts screen.
Setup Contacts Membership Types and Subtypes
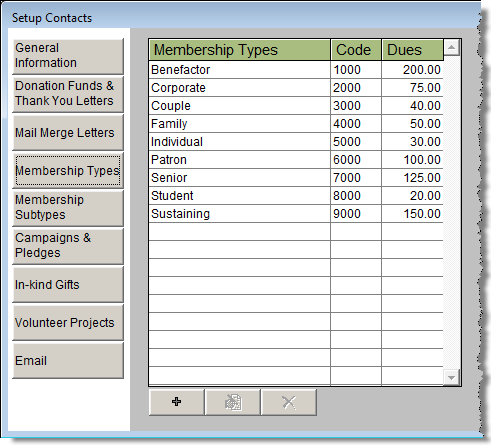
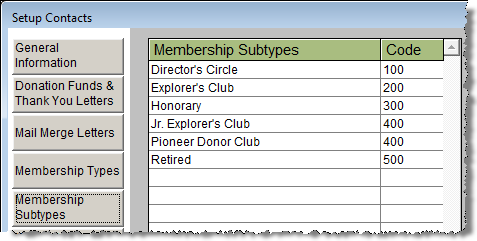
To add a new membership type or subtype, click the plus sign button. Enter the name of a type (or membership level) in the New Entry field of the Add New Entry screen. Each type and subtype may be assigned a Code. By assigning multiple types and subtypes to a single code you can group them together for accounting purposes. Next, enter the dues amount for the membership type in the Dues field. Then click Add to add the new membership type or subtype to the list.
To edit a membership type or subtype name, code, or dues amount, select the name and click the edit button. On the Modify Entry screen, make your changes, then click Save.
Please note that if you need to edit a type or subtype name that has already been used for memberships, you will need to do a global change for all members who currently have that type or subtype. If you have posted dues for members with that type or subtype, you will also need to change the type on the Dues Receipt Detail screen for each dues payment that was posted at the old membership type. Otherwise the name will not show up on the Membership screen or Dues Receipt Detail screen, and it will be more difficult to run reports by that membership type or subtype.
We suggest that you avoid deleting a membership type or subtype once you have created memberships using the type or subtype. You will not see that type or subtype on the Membership and Dues Receipt Detail screens, and you will not easily be able to run reports to find members with that type or subtype. If you need to delete a type or subtype, click on the name, then click the red X button, then click Yes to delete the name.
If your organization's membership types have changed, we recommend that you add the new types and keep the old ones. This way you will be able to track member levels over time in both the old and new systems.
Campaigns & Pledges
PastPerfect includes the option to keep track of fundraising campaigns and pledges that contacts make toward those campaigns. On this screen, you can compose the Default Pledge Thank You Letter and the Default Pledge Payment Reminder Letter. These default letters will be used as the templates for when you compose new letters on the Campaign Management screen. You may also set up a default Excel spreadsheet for your campaign costs if you have the MultiMedia Upgrade and MS-Excel installed on your computer.
Pledge Default Letters - To compose a default letter for either the Pledge Thank You Letter or the Pledge Payment Reminder Letter, click on the appropriate button. Compose your default letter in the MS-Word screen. Composing the Thank You Letter and the Payment Reminder Letter on the Campaign Management screen will be discussed further in Chapter 23 - Campaigns and Pledges.
Default Excel Spreadsheet for Costs - This Excel spreadsheet should be set up with actions, due dates, names of people involved, and costs for managing your campaign. This spreadsheet will be the template used when accessing the Excel Spreadsheet for Costs on the Campaign Management screen.
In-kind Gifts
In addition to recording monetary donations and dues payments, PastPerfect also tracks in-kind gifts. You may set up different types of in-kind gifts to standardize how they are recorded. You may also create a default thank you letter for in-kind gifts. This default letter applies to all types of in-kind gifts. Once you have posted the in-kind gift for a contact, you will be able personalize the letter.
Click the plus sign button to add a new in-kind gift type. Enter the name of the gift type in the New Entry field. Each type can be assigned a Code. Codes are optional and can be used to group multiple types for accounting purposes. Then click Add to add the new type to the list.
To edit a type or code, click once on the name and click the edit button. Make your changes on the Modify Entry screen, then click Save. Please note that if you need to edit a type for which you have already posted a gift, you will need to go to each of those In-kind Gift Detail screens and change the type manually. Otherwise the type will not show up on the In-kind Gift Detail screen, and you will not be able to run reports easily by that gift type.
Once you have posted a gift with a specific type, we suggest that you avoid deleting that type. You will not see that type on the In-kind Gift Detail screen, and you will not be able to run reports easily on that In-kind Gift type. If you need to delete a type, click on the name, then click the red X button, then click Yes to delete it.
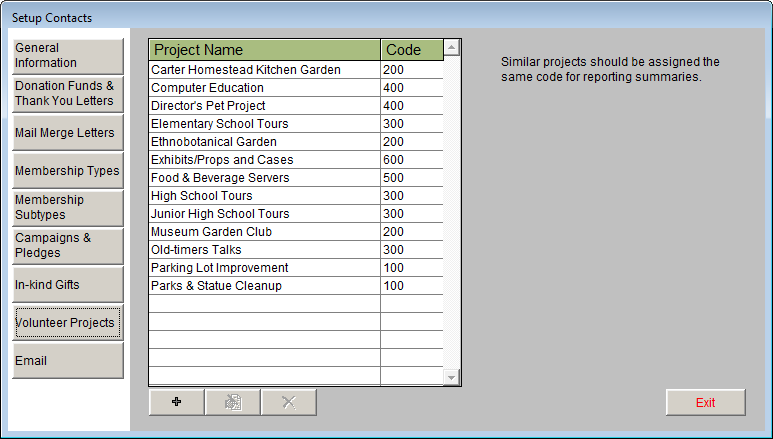
Volunteer Projects
When managing volunteers, it is important to keep track of the different types of activities or projects that each volunteer takes part in at your organization. This information can be helpful when reporting total volunteer hours at the end of the year, seeing where most volunteer hours are utilized at your organization, or when applying for grants. The Volunteer Projects screen will enable you to add new volunteer project names, which are then available in the Project drop-down menu when entering volunteer hours. There is no limit to the number of projects that you may create.
To add a Project, click the plus sign button, then type a project name and project code and click Add. Each project must be assigned a project code. Multiple projects may be assigned to a single code for reporting purposes.
Projects may be edited and deleted; however, the same warnings apply as for editing and deleting Membership Types and Subtypes. To edit a project name or code, click on the name and click the edit button. Make your changes, then click Save. To delete an existing project, click a project name to select it. Click the red X button, and then click Yes to confirm the deletion of the project from the list.
Setup Contacts Volunteer Projects
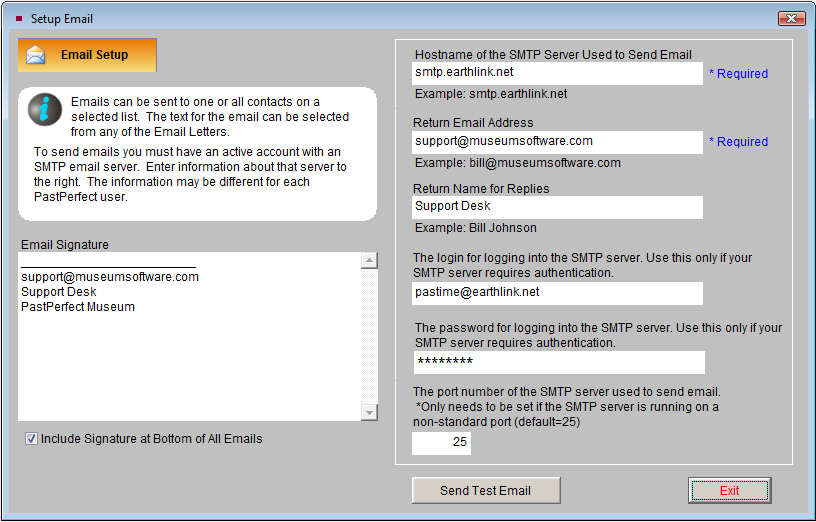
You may send emails from PastPerfect to individual contacts or to groups of contacts on a list. To send emails, you must have an active account with an SMTP email server. Information about your account must be entered on the Setup Email screen. To access this screen click the Email Setup button. This will open the Setup Email screen shown below.
With Security enabled, each PastPerfect user will have different setup information which includes the host name of your SMTP server, your return email address, and your return name for replies. For some email servers, that is all the information required to send emails. For others, you may need to enter a user name, password and port number. If you have questions about these entries, your internet service provider or email administrator can help.
On the left of the screen is a box where you can enter an email signature. Text entered there will be appended to the bottom of each email you send. Once your settings are entered, you may test them by clicking the Send Test Email button at the bottom of the screen. You will need to enter an email address in the To Address field. This should be your email address, or an address of an email account to which you have access, so you can verify the email was received. After successfully sending the email and clicking Cancel to close the test email screen, click Exit to close the Setup Email screen.
Setup Email screen
The Email screen is also used to compose your email letters. To compose an email letter, click the plus sign button. Enter a name for the email letter and click Add. The new email letter will be added to the list. Highlight the letter, then click the Compose Selected Email button and the Compose Email Text screen will appear. Please see Chapter 22 - Letters, Labels & Email for more information about composing and sending emails.
The Contacts section has its own Authority Files, Custom Fields, Browse screen setup, and Query and Report Maker field selections. It is recommended that you take a look at these sections under Setup on the Main Menu, before beginning your data entry.