Pledges
Part of your fundraising campaigns may be to collect pledges. Pledges are a useful tool for gauging how much money you will be collecting over time, assuming all pledged money is collected. PastPerfect can track your pledges, allowing you to send reminder and thank you letters to contacts after they pledge an amount. Using the schedule of payments on the Pledge Detail screen, you can easily see when a contact's next payment should be, how much it will be, and how much has already been paid. When a contact makes a payment toward a pledge, it is entered under the Donations screen view. The Campaigns screen will show you how much money has been pledged and how much has been received for each campaign.
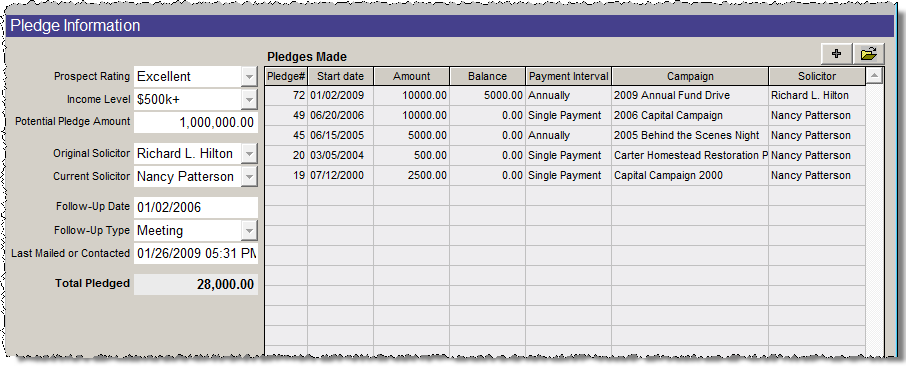
To begin, pledges are entered on the Pledges Screen View of the Contacts section, seen below.
Pledges Screen View

To enter a new pledge, click the Contacts button on the Main Menu. Find the record for the contact who is giving the pledge and click the Pledges button on the Sidebar.
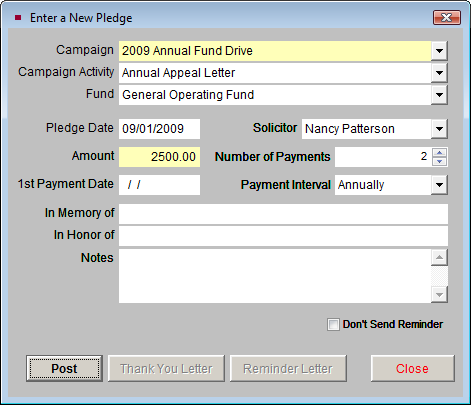
Enter a New Pledge screen

To enter a pledge:
- Click Enter a New Pledge under Actions on the Sidebar. The screen above will appear.
- Select a Campaign and Campaign Activity from the drop-down menus. By entering these fields, you ensure that you can track the pledge on the Campaign screen. To create Campaigns and Campaign Activities, please see the Creating and Managing Campaigns section of this chapter.
- Select a Fund from the drop-down menu. This may be the same fund linked to your campaign, or a different fund. Please see Chapter 20 - Contacts for information about setting up funds.
- Select a Solicitor, if any, from the drop-down menu. The names on this list can be changed by going to the Main Menu | Setup | Authority Files | Contacts.
- Enter a Pledge Date. Today's date is entered automatically, but you may enter any date you like.
- Enter the Amount (the full pledge amount), then enter the date the first payment is expected in the 1st Payment Date field. A value must be entered into these fields for the pledge to be posted. You may also enter the Number of Payments that can be expected, as well as the Payment Interval. Based on these fields, PastPerfect will generate the schedule of payments for this pledge.
- Enter the In Memory of or In Honor of names, if appropriate. If there are any notes related to this pledge, enter them in the Notes section.
- If you do not wish to send a reminder letter, check the Don't Send Reminder box. A reminder letter will not be generated if you print the letters in a batch from the Reports section of the program. Otherwise, leave that box empty.
- Click Post.
Please note that posting the pledge simply creates a pledge record. If the contact is also making the first payment on a pledge, you will need to enter the payment under the Donations screen and apply it to this pledge. When posting a donation for a contact who has an open pledge, you will be asked if you want to apply the donation to the specific pledge. The pledged amount will be added to the appropriate campaign screen, in the Pledged column. After a pledge has been posted, the Thank You Letter and Reminder Letter options become activated.
Pledge Letters
The Pledge Thank You letter should be sent to the donor thanking them for the pledge. Reminder letters function much like an invoice or gentle reminder that a pledge was made and a payment is due on a specific date. For each pledge there is only one Thank You Letter, but there can be multiple Reminder Letters, one for each payment.
The Pledge Thank You Letter should be sent when the pledge is made. This letter is composed by going to the Main Menu | Campaigns | Pledge Thank You Letter. Please see Chapter 22 - Letters, Labels & Email for more information about composing letters.
The Pledge Reminder Letter may be sent when the pledge is made if the first scheduled payment is due. However, this letter may be printed at a later date from the Pledge Detail screen. This letter is composed by going to the Main Menu | Campaigns | Pledge Payment Reminder Letter.
Pledge Detail Screen
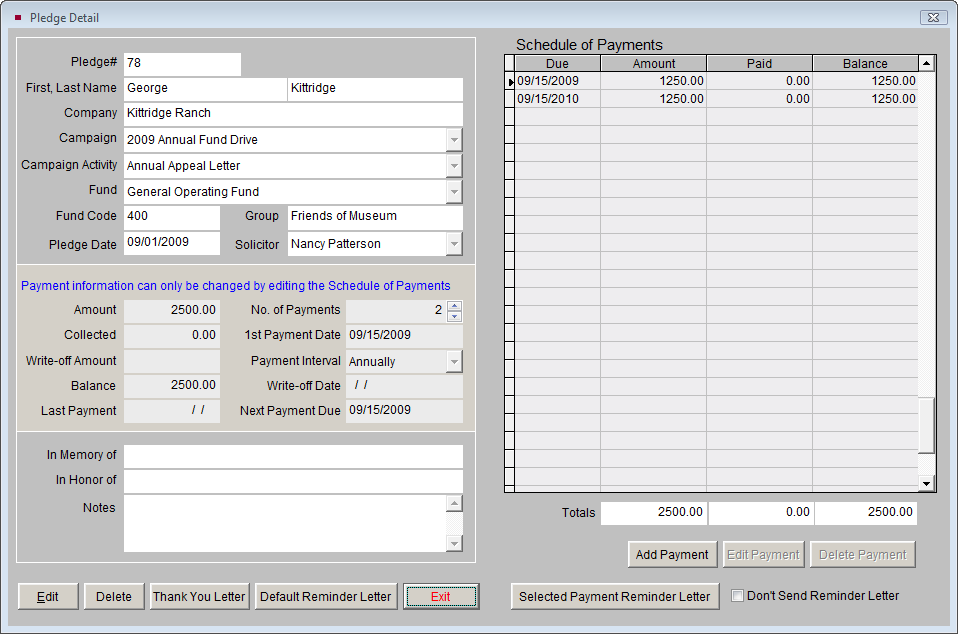
The Pledge Detail screen is accessed by double clicking on a pledge in the list of Pledges Made on the Contacts Pledges Screen View. This screen gives you the option to print your pledge letters, in addition to giving you access to details associated with a single pledge, including: the contact's name, company, campaign, activity, solicitor, schedule of payments, etc.
Pledge Detail screen

On the right side of the Pledge Detail screen is a spreadsheet with the Schedule of Payments where you can view the amount promised, the date the payment is due, the amount paid, and the remaining balance. PastPerfect automatically calculates the totals at the foot of each column.
Making changes to the Schedule of Payments will alter the payment information in the middle part of the left side of the screen. You may add, edit or delete payments in the schedule by using the buttons at the bottom of the Schedule of Payments. Deleting payments will increase the amount in the Write-off Amount field and place today's date in the Write-off Date field. To write off a pledge completely, delete all of the unpaid payments.
Sending Payment Reminder Letters
These letters are set up first as the Default Pledge Payment Reminder Letter under Main Menu | Setup | Contacts | Campaigns & Pledges. They are composed for each campaign on the Campaign screen, using the Setup Pledge Payment Reminder Letter button. The letter you composed on the Campaign screen can be viewed on the Pledge Detail screen by clicking the Default Reminder Letter button. Looking at this letter, you will see that some merge fields such as <Payment_amount> and <Payment_date> still appear in brackets. They will be replaced in the next step. You may make changes to the letter at this point, which will be used in all the reminder letters sent to this contact. You will want to preview this letter before printing the Selected Payment Reminder Letter.
Pledge Detail screen

Since a pledge may be paid off in multiple payments over time, a separate reminder letter is created for each payment. From the Pledge Detail screen select a pledge payment from the Schedule of Payments list on the right and then click the button Selected Payment Reminder Letter. The letter will display in MS-Word, where it can be printed. As long as you have previewed the Default Reminder Letter, the merge fields will be filled in appropriately for this payment.
You can also print all pledge payment reminder letters for any pledges due within a specified date range from the Reports menu. From the Main Menu click on Reports | Pledges | Pledge Reminder Letters | Run Selected Report.